In most applications, users navigate from one view to the next as they perform application tasks.
The browser is a familiar model of application navigation. We enter a URL in the address bar and the browser navigates to a corresponding page. We click links on the page and the browser navigates to a new page. We click the browser's back and forward buttons and the browser navigates backward and forward through the history of pages we've seen.
The Angular "Component Router" (AKA "the router") borrows from this model. It can interpret a browser URL as an instruction to navigate to a client-generated view and pass optional parameters along to the supporting view component to help it decide what specific content to present. We can bind the router to links on a page and it will navigate to the appropriate application view when the user clicks a link. We can navigate imperatively when the user clicks a button, selects from a drop box, or in response to some other stimulus from any source. And the router logs activity in the browser's history journal so the back and forward buttons work as well.
We'll learn many router details in this chapter which covers
- loading the router library and setting the base href
- configuring a router
- the link parameters array that propels router navigation
- navigating when the user clicks a data-bound RouterLink
- navigating under program control
- embedding critical information in the URL with route parameters
- creating a child router with its own routes
- setting a default route
- confirming or canceling navigation with router lifecycle hooks
- passing optional information in query parameters
- choosing the "HTML5" or "hash" URL style
We proceed in phases marked by milestones building rom a simple two-pager with placeholder views up to a modular, multi-view design with child routes.
Try that live final version.
But first, an overview of router basics.
The Basics
Let's begin with a few core concepts of the Component Router. Then we can explore the details through a sequence of examples.
Setup
The Angular Component Router is an optional service that presents a particular component view for a given URL.
It is not part of the Angular 2 core. It is in its own library
within the Angular npm bundle.
We make it available by loading its script in our index.html, after
the Angular core script.
<base href>
Most routing applications should add a <base> element just after the <head> tag
to tell the router how to compose navigation URLs.
If the app folder is the application root, as it is for our sample application,
set the href value exactly as shown here.
We cover other options in the details below.
Configuration
When the browser's URL changes, the router looks for a corresponding RouteDefinition
from which it can determine the component to display.
A new router has no route definitions. We have to configure it.
The preferred way to configure the router is with a @RouteConfig decorator
applied to a host component.
In this example, we configure the top-level AppComponent with three route definitions
There are several flavors of RouteDefinition.
The most common by far is the named Route which maps a URL path to a component
The name field is the name of the Route. The name must be spelled in PascalCase.
The :id in the third route is a token for a route parameter. In a URL such as /hero/42, "42"
is the value of the id parameter. The corresponding HeroDetailComponent
will use that value to find and present the hero whose id is 42.
We'll learn more about route parameters later in this chapter.
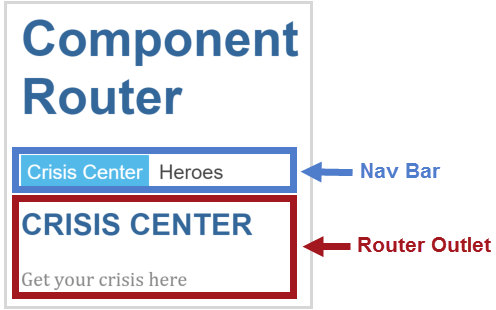
Router Outlet
Now we know how the router gets its configuration.
When the browser URL for this application becomes /heroes,
the router matches that URL to the RouteDefintion named Heroes and displays the HeroListComponent
in a RouterOutlet that we've placed in the host view's HTML.
Router Links
Now we have routes configured and a place to render them, but how do we navigate? The URL could arrive directly from the browser address bar. But most of the time we navigate as a result of some user action such as the click of an anchor tag.
We add a RouterLink directive to the anchor tag and bind it to a template expression that
returns an array of route link parameters (the link parameters array). The router ultimately resolves that array
into a URL and a component view.
We see such bindings in the following AppComponent template:
We're adding two anchor tags with RouterLink directives.
We bind each RouterLink to an array containing the string name of a route definition.
'CrisisCenter' and 'Heroes' are the names of the Routes we configured above.
We'll learn to write more complex link expressions — and why they are arrays — later in the chapter.
Let's summarize
The @RouterConfig configuration tied the AppComponent to a router configured with routes.
The component has a RouterOutlet where it can display views produced by the router.
It has RouterLinks that users can click to navigate via the router.
The AppComponent has become a Routing Component, a component that can route.
Here are the key Component Router terms and their meanings:
| Router Part | Meaning |
|---|---|
Router | Displays the application component for the active URL. Manages navigation from one component to the next. |
@RouteConfig | Configures a router with RouteDefinitions, each mapping a URL path to a component. |
RouteDefinition | Defines how the router should navigate to a component based on a URL pattern. |
Route | The most common form of RouteDefinition consisting of a path, a route name,
and a component type. |
RouterOutlet | The directive (<router-outlet>) that marks where the router should display a view. |
RouterLink | The directive for binding a clickable HTML element to
a route. Clicking an anchor tag with a routerLink directive
that is bound to a Link Parameters Array triggers a navigation. |
| Link Parameters Array | An array that the router inteprets into a routing instruction.
We can bind a RouterLink to that array or pass the array as an argument to
the Router.navigate method. |
| Routing Component | An Angular component with an attached router. |
We've barely touched the surface of the router and its capabilities.
The following detail sections describe a sample routing application as it evolves over a sequence of milestones. We strongly recommend taking the time to read and understand this story.
The Sample Application
We have an application in mind as we move from milestone to milestone.
While we make incremental progress toward the ultimate sample application, this chapter is not a tutorial. We discuss code and design decisions pertinent to routing and application design. We gloss over everything in between.
The full source is available in the live example.
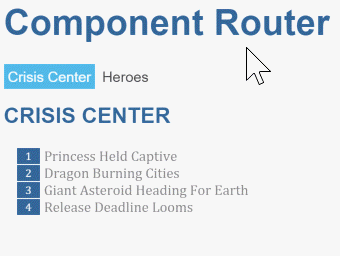
Our client is the Hero Employment Agency. Heroes need work and The Agency finds Crises for them to solve.
The application has two main feature areas:
- A Crisis Center where we maintain the list of crises for assignment to heroes.
- A Heroes area where we maintain the list of heroes employed by The Agency.
Run the live example. It opens in the Crisis Center. We'll come back to that.
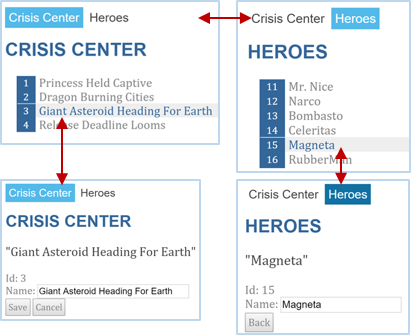
Click the Heroes link. We're presented with a list of Heroes.
We select one and the applications takes us to a hero editing screen.
Our changes take affect immediately. We click the "Back" button and the app returns us to the Heroes list.
We could have clicked the browser's back button instead. That would have returned us to the Heroes List as well. Angular app navigation updates the browser history as normal web navigation does.
Now click the Crisis Center link. We go to the Crisis Center and its list of ongoing crises.
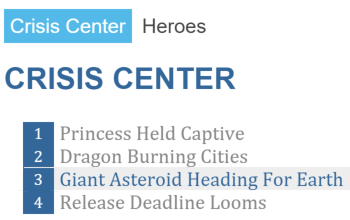
We select one and the applications takes us to a crisis editing screen.
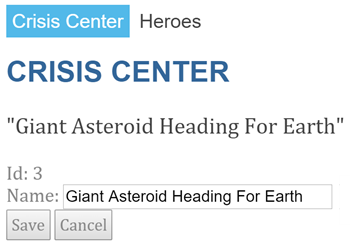
This is a bit different from the Hero Detail. Hero Detail saves the changes as we type. In Crisis Detail our changes are temporary until we either save or discard them with by pressing the "Save" or "Cancel" buttons. Both buttons navigate back to the Crisis Center and its list of crises.
Suppose we click a crisis, make a change, but do not click either button. Maybe we click the browser back button instead. Maybe we click the "Heroes" link.
Do either. Up pops a dialog box.
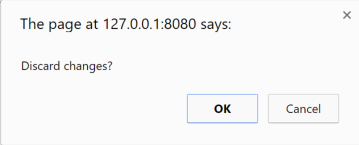
We can say "OK" and lose our changes or click "Cancel" and continue editing.
The router supports a routerCanDeactivate lifecycle hook that gives us a chance to clean-up
or ask the user's permission before navigating away from the current view.
Here we see an entire user session that touches all of these features.
Here's a diagram of all application routing options:
This app illustrates the router features we'll cover in this chapter
- navigating to a component (Heroes link to "Heroes List")
- including a route parameter (passing the Hero
idwhile routing to the "Hero Detail") - child routes (the Crisis Center has its own routes)
- the
routerCanDeactivatelifecycle hook (ask permission to discard unsaved changes)
Milestone #1: Getting Started with the Router
Let's begin with a simple version of the app that navigates between two empty views.
Load the Component Router library
The Component Router is not part of the Angular 2 core. It is in its own library. The router is an optional service and you might prefer a different router someday.
The Component Router library is part of the Angular npm bundle.
We make it available by loading its script in our index.html, right after
the Angular core script.
Set the <base href>
The Component Router uses the browser's
history.pushState
for navigation. Thanks to pushState, we can make our in-app URL paths look the way we want them to
look, e.g. localhost:3000/crisis-center. Our in-app URLs can be indistinguishable from server URLs.
Modern HTML 5 browsers were the first to support pushState which is why many people refer to these URLs as
"HTML 5 style" URLs.
We must add a <base href> element tag
to the index.html to make this work.
The href value specifies the base URL to use for all relative URLs within a document including
links to css files, scripts, and images.
Add the base element just after the <head> tag.
If the app folder is the application root, as it is for our application,
set the href value exactly as shown here.
HTML 5 style navigation is the Component Router default. Learn why "HTML 5" style is preferred, how to adjust its behavior, and how to switch to the older hash (#) style if necessary in the Browser URL Styles appendix below.
Live example note
We have to be get tricky when we run the live example because the host service sets
the application base address dynamically. That's why we replace the <base href...> with a
script that writes a <base> tag on the fly to match.
We should only need this trick for the live example, not production code.
Booting with the router service providers
Our app launches from the boot.ts file in the /app folder so let's start there.
It's short and all of it is relevant to routing.
We import our root AppComponent and Angular's bootstrap function as expected.
We also import ROUTER_PROVIDERS from the router library.
The router is a service implemented by a collection of Dependency Injection providers, most of which are identified in the
ROUTER_PROVIDERS array.
We're booting Angular with AppComponent as our app's root component and
registering providers, as we often do, in the providers array in the second parameter of the bootstrap function.
Providing the router providers at the root makes the Component Router available everywhere in our application.
Learn about providers, the provide function, and injected services in the
Dependency Injection chapter.
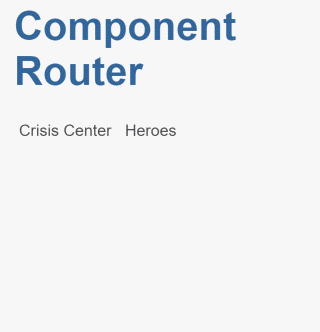
The AppComponent shell
The root AppComponent is the application shell. It has title at the top, a navigation bar with two links,
and a Router Outlet at the bottom where the router swaps views on and off the page. Here's what we mean:
The corresponding component template looks like this:
RouterOutlet
RouterOutlet is a component from the router library.
The router displays views within the bounds of the <router-outlet> tags.
A template may hold exactly one unnamed <router-outlet>.
RouterLink binding
Above the outlet, within the anchor tags, we see Property Bindings to
the RouterLink directive that look like [routerLink]="[...]". We imported RouterLink from the router library.
The template expression to the right of the equals (=) returns a link parameters array.
A link parameters array holds the ingredients for router navigation:
- the name of the route that prescribes the destination component and a path for the URL
- the optional route and query parameters that go into the route URL
The arrays in this example each have a single string parameter, the name of a Route that
we'll configure for this application with @RouteConfig(). We don't need to set route parameters yet.
Learn more about the link parameters array in the appendix below.
@RouteConfig()
A router holds a list of route definitions. The list is empty for a new router. We must configure it.
A router also needs a Host Component, a point of origin for its navigations.
It's natural to combine the creation of a new router, its configuration, and its assignment to a host component
in a single step. That's the purpose of the @RouteConfig decorator which we put to good use here:
The @RouteConfig decorator creates a new router.
We applied the decorator to AppComponent which makes that the router's host component.
The argument to @RouteConfig() is an array of Route Definitions.
We're supplying two definitions:
Each definition translates to a Route which has a
path- the URL path segment for this routename- the name of the routecomponent- the component associated with this route.
The router draws upon its registry of route definition when
- the browser URL changes
- we tell the router to go to a named route
In plain English, we might say of the first route:
When the browser's location URL changes to match the path segment
/crisis-center, create or retrieve an instance of theCrisisCenterComponentand display its view.When the application requests navigation to a route named
CrisisCenter, compose a browser URL with the path segment/crisis-center, update the browser's address location and history, create or retrieve an instance of theCrisisCenterComponent, and display that component's view.
"Getting Started" wrap-up
We've got a very basic, navigating app, one that can switch between two views when the user clicks a link.
We've learned how to
- load the router library
- add a nav bar to the shell template with anchor tags and
routerLinkdirectives - added a
router-outletto the shell template where views will be displayed - configure the router with
@RouterConfig - set the router to compose "HTML 5" browser URLs.
The rest of the starter app is mundane, with little interest from a router perspective. Here are the details for readers inclined to build the sample through to this milestone.
Our starter app's structure looks like this:
Here are the files discussed in this milestone
Milestone #2: The Heroes Feature
We've seen how to navigate using the RouterLink directive.
Now we'll learn some new tricks such as how to
- organize our app into feature areas
- navigate imperatively from one component to another
- pass information along in route parameters (
RouteParams)
To demonstrate, we'll build out the Heroes feature.
The Heroes "feature area"
A typical application has multiple feature areas, each an island of functionality with its own workflow(s), dedicated to a particular business purpose.
We could continue to add files to the app/ folder.
That's unrealistic and ultimately not maintainable.
We think it's better to put each feature area in its own folder.
Our first step is to create a separate app/heroes/ folder
and add Hero Management feature files there.
We won't be creative about it. Our example is pretty much a copy of the code and capabilities in the "Tutorial: Tour of Heroes".
Here's how the user will experience this version of the app
Add Heroes functionality
We delete the placeholder hero-list.component.ts that's in
the app/ folder.
We create a new hero-list.component.ts in the app/heroes/
folder and copy over the contents of the final heroes.component.ts from the tutorial.
We also copy the hero-detail.component.ts and the hero.service.ts files
into the heroes/ folder.
When were done organizing, we have three Hero Management files:
We provide the HeroService in the application root AppComponent
so that is available everywhere in the app.
Now it's time for some surgery to bring these files and the rest of the app into alignment with our application router.
New route definition with route parameter
The new Heroes feature has two interacting components, the list and the detail. The list view is self-sufficient; we navigate to it, it gets a list of heroes and displays them. It doesn't need any outside information.
The detail view is different. It displays a particular hero. It can't know which hero on its own. That information must come from outside.
In our example, when the user selects a hero from the list, we navigate to the detail view to show that hero. We'll tell the detail view which hero to display by including the selected hero's id in the route URL.
With that plan in mind, we return to the app.component.ts to make changes to the router's configuration
First, we import the two components from their new locations in the app/heroes/ folder:
Then we update the @RouteConfig route definitions :
The CrisisCenter and Heroes definitions didn't change.
While we moved hero-list.component.ts to a new location in the app/heroes/ folder, that only affects the import statement;
it doesn't affect its route definition.
We added a new route definition for the HeroDetailComponent — and this definition has a twist.
Notice the :id token in the the path. That creates a slot in the path for a Route Parameter.
In this case, we're expecting the router to insert the id of a hero into that slot.
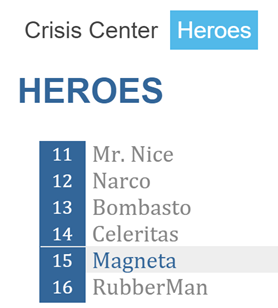
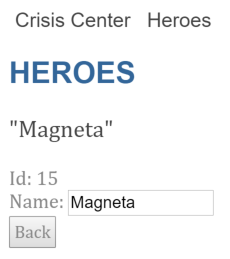
If we tell the router to navigate to the detail component and display "Magneta", we expect hero id (15) to appear in the
browser URL like this:
If a user enters that URL into the browser address bar, the router should recognize the pattern and go to the same "Magneta" detail view.
Navigate to the detail imperatively
We don't navigate to the detail component by clicking a link. We won't be adding a new anchor tag to the shell navigation bar.
Instead, we'll detect when the user selects a hero from the list and command the router to present the hero detail view of the selected hero.
We'll adjust the HeroListComponent to implement these tasks, beginning with its constructor
which acquires the router service and the HeroService by dependency injection:
We make a few changes to the template:
The template defines an *ngFor repeater such as we've seen before.
There's a (click) EventBinding to the component's onSelect method
which we implement as follows:
It calls the router's navigate method with a Link Parameters Array.
This array is similar to the link parameters array we met earlier in an anchor tag while
binding to the RouterLink directive. This time we see it in code rather than in HTML.
Setting the route parameters object
We're navigating to the HeroDetailComponent where we expect to see the details of the selected hero.
We'll need two pieces of information: the destination and the hero's id.
Accordingly, the link parameters array has two items: the name of the destination route and a route parameters object that specifies the
id of the selected hero.
The router composes the appropriate two-part destination URL from this array:
Getting the route parameter
How does the target HeroDetailComponent learn about that id?
Certainly not by analyzing the URL! That's the router's job.
The router extracts the route parameter (id:15) from the URL and supplies it to
the HeroDetailComponent via the RouteParams service.
As usual, we write a constructor that asks Angular to inject that service among the other services that the component require and reference them as private variables.
Later, in the ngOnInit method,
we ask the RouteParams service for the id parameter by name and
tell the HeroService to fetch the hero with that id.
Angular calls the ngOnInit method shortly after creating an instance of the HeroDetailComponent.
We put the data access logic in the ngOnInit method rather than inside the constructor
to improve the component's testability.
We explore this point in greater detail in the OnInit appendix below.
Navigating back to the list component
The HeroDetailComponent has a "Back" button wired to its gotoHeroes method that navigates imperatively
back to the HeroListComponent.
The router navigate method takes the same one-item link parameters array
that we wrote for the [routerLink] directive binding.
It holds the name of the HeroListComponent route:
Heroes App Wrap-up
We've reached the second milestone in our router education.
We've learned how to
- organize our app into feature areas
- navigate imperatively from one component to another
- pass information along in route parameters (
RouteParams)
After these changes, the folder structure looks like this:
The Heroes App code
Here are the relevant files for this version of the sample application.
Milestone #3: The Crisis Center
The Crisis Center is a fake view at the moment. Time to make it useful.
The new Crisis Center begins as a virtual copy of the Heroes feature.
We create a new app/crisis-center folder, copy the Hero files,
and change every mention of "hero" to "crisis".
A Crisis has an id and name, just like a Hero
The new CrisisListComponent displays lists of crises.
When the user selects a crisis, the app navigates to the CrisisDetailComponent
for display and editing of the crisis name.
Voilà, instant feature module!
There's no point to this exercise unless we can learn something. We do have new ideas and techniques in mind:
The application should navigate to the Crisis Center by default.
The user should be able to cancel unwanted changes.
The router should prevent navigation away from the detail view while there are pending changes.
There are also a few lingering annoyances in the Heroes implementation that we can cure in the Crisis Center.
We currently register every route of every view at the highest level of the application. If we expand the Crisis Center with a 100 new views, we'll make 100 changes to the
AppComponentroute configuration. If we rename a Crisis Center component or change a route definition, we'll be changing theAppComponenttoo.If we followed Heroes lead, we'd be adding the
CrisisServiceto the providers inapp.component.ts. Then bothHeroServiceandCrisisServicewould be available everywhere although they're only needed in their respective feature modules. That stinks.
Changes to a sub-module such as Crisis Center shouldn't provoke changes to the AppComponent or boot.ts.
We need to separate our concerns.
We'll fix all of these problems and add the new routing features to Crisis Center.
The most significant fix is the introduction of a child Routing Component and its child router
We'll leave Heroes in its less-than-perfect state to serve as a contrast with what we hope is a superior Crisis Center.
A free-standing Crisis Center Feature Module
The Crisis Center is one of two application workflows. Users navigate between them depending on whether they are managing crises or heroes.
The CrisisCenter and Heroes components are children of the root AppComponent.
Unfortunately, they and their related files are physically commingled in the same folder with the AppComponent.
We'd prefer to separate them in their own feature areas so they can operate and evolve independently.
Someday we might re-use one or the other in a different application.
Someday we might load one of them dynamically only when the user chose to enter its workflow.
Some might call it yagni to even think about such things.
But we're right to be nervous about the way Heroes and Crisis Center artifacts are
bubbling up to the root AppComponent and blending with each other.
That's a code smell.
Isolating feature area modules from each other looks good to us.
It's looking good as a general pattern for Angular applications.
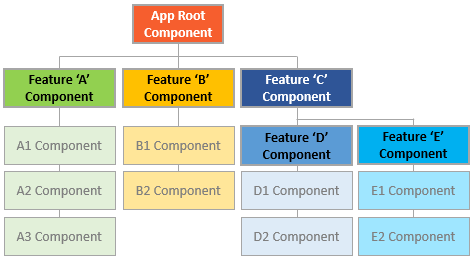
- each feature area in its own module folder
- each area with its own root component
- each area root component with its own router-outlet and child routes
- area routes rarely (if ever) cross
We'll make the Crisis Center stand on its own and leave the Heroes as it is so we can compare the effort, results, and consequences. Then each of us can decide which path to prefer (as if we didn't already know).
Child Routing Component
We create a new app/crisis-center folder and add crisis-center-component.ts to it with the following contents:
The CrisisCenterComponent parallels the AppComponent.
The CrisisCenterComponent is the root of the Crisis Center area
just as AppComponent is the root of the entire application.
This CrisisCenterComponent is a shell for crisis management
just as the AppComponent is a shell to manage the high-level workflow.
AppComponent has a @RouteConfig decorator that defines the top-level routes.
CrisisCenterComponent has a @RouteConfig decorator that defines Crisis Center child routes.
The CrisisCenterComponent template is dead simple — simpler even than the AppComponent template.
It has no content, no links, just a <router-outlet> for the Crisis Center child views.
It has no selector either. It doesn't need one. We don't embed this component in a parent template. We navigate to it from the outside, via a parent router (more on that soon).
Service isolation
We add the CrisisService to the component's providers array
instead of registering it with the bootstrap function in boot.ts.
This step limits the scope of that service to the Crisis Center component and its sub-component tree.
No component outside of the Crisis Center needs access to the CrisisService.
By restricting its scope, we feel confident that we can evolve it independently without fear of breaking
unrelated application modules — modules that shouldn't have access to it anyway.
Child Route Configuration
The CrisisCenterComponent is a Routing Component like the AppComponent.
The @RouteConfig decorator that adorns the CrisisCenterComponent class defines routes in much the same way
that we did earlier.
There is an important difference in the paths. They both begin at /.
Normally such paths would refer to the root of the application.
Here they refer to the root of the child component!.
The Component Router composes the final route by concatenating route paths beginning with the ancestor paths to this child router.
In our example, there is one ancestor path: "crisis-center".
The final route to the HeroDetailComponent displaying hero 11 would be something like:
We cannot know this simply by looking at the CrisisCenterComponent alone.
We can't tell that it is a child routing component.
We can't tell that its routes are child routes; they are indistinguiable from top level application routes.
Such ignorance is intentional. The Crisis Center shouldn't know that it is the child of anything. Today it is a child component one level down. Tomorrow it might be the top level component of its own application. Next month it might be re-purposed in a different application. The Crisis Center itself is indifferent to these possibilities.
We make it a child component of our application by reconfiguring the routes of the top level AppComponent.
Parent Route Configuration
Here is is the revised route configuration for the parent AppComponent:
The last two Hero routes haven't changed.
The first Crisis Center route has changed — significantly — and we've formatted it to draw attention to the differences:
Notice that the path ends with a slash and three trailing periods (/...).
That means this is an incomplete route (AKA a non-terminal route). The finished route will be some combination of
the parent /crisis-center/ route and a route from the child router that belongs to the designated component.
All is well.
The parent route's designated component is the CrisisCenterComponent which is a Routing Component with its own router and routes.
Default route
The other important change is the addition of the useAsDefault property.
Its value is true which makes this route the default route.
When the application launches, in the absence of any routing information from the browser's URL, the router
will default to the Crisis Center. That's our plan.
Routing to the Child
We've set the top level default route to go to the CrisisCenterComponent.
The final route will be a combination of /crisis-center/
and one of the child CrisisCenterComponent router's three routes. Which one?
It could be any of the three. In the absence of additional information, the router can't decide and must throw an error.
We've tried the sample application and it didn't fail. We must have done something right.
Scroll to the end of the child CrisisCenterComponents first route.
There is useAsDefault: true again. That tells the router to compose the final URL using the path from the default child route.
Concatenate the base URL with /crisis-center/ and /, remove extraneous slashes, and we get:
Handling Unsaved Changes
Back in the "Heroes" workflow, the app accepts every change to a hero immediately without hesitation or validation. In the real world, we might have to accumulate the users changes. We might have to validate across fields. We might have to validate on the server. We might have to hold changes in a pending state until the user confirms them as a group or cancels and reverts all changes.
What do we do about unapproved, unsaved changes when the user navigates away? We'd like to pause and let the user decide what to do. Perhaps we'll cancel the navigation, stay put, and make more changes.
We need the router's cooperation to pull this off. We need router lifecycle hooks.
Router Lifecycle Hooks
Angular components have lifecycle hooks. For example, Angular calls the hook methods of the OnInit and OnDestroy interfaces when it creates and destroys components.
The router calls similar hook methods, routerCanActivate and routerCanDeactivate, before it navigates to a component or away from a component.
If a can... method returns true, the navigation proceeds. If it returns false, the
router cancels the navigation and stays on the current view.
The router lifecycle hooks supplement the component lifecycle hooks. We still need the component hooks but the router hooks do what the component hooks cannot.
For example, the component hooks can't stop component creation or destruction. Because they are synchronous, they can't pause view navigation to wait for an asynchronous process to finish.
Imagine we have unsaved changes. The user starts to navigate away. We shouldn't lose the user's changes; that would be a terrible experience. So we try to save those changes to the server.
If the save fails for any reason (perhaps the data are ruled invalid), what do we do?
If we let the user move to the next screen, we have lost the context of the error. We can't block while waiting for the server — that's not possible in a browser.
We need to stop the navigation while we wait, asynchronously, for the server to return with its answer.
The router hook methods can pause asynchronously, return promises, and cancel navigation if necessary.
Cancel and Save
Our sample application doesn't talk to a server. Fortunately, we have another way to demonstrate an asynchronous router hook.
Users update crisis information in the CrisisDetailComponent.
Unlike the HeroDetailComponent, the user changes do not update the
crisis entity immediately. We update the entity when the user presses the Save button.
We discard the changes if the user presses he Cancel button.
Both buttons navigate back to the crisis list after save or cancel.
What if the user tries to navigate away without saving or canceling? The user could push the browser back button or click the heroes link. Both actions trigger a navigation. Should the app save or cancel automatically?
We'll do neither. Instead we'll ask the user to make that choice explicitly in a confirmation dialog box that waits asynchronously for the user's answer.
We could wait for the user's answer with synchronous, blocking code. Our app will be more responsive ... and can do other work ... by waiting for the user's answer asynchronously. Waiting for the user asynchronously is like waiting for the server asynchronously.
The DialogService (injected in the AppComponent for app-wide use) does the asking.
It returns a promise that
resolves when the user eventually decides what to do: either
to discard changes and navigate away (true) or to preserve the pending changes and stay in the crisis editor (false).
We execute the dialog inside the router's routerCanDeactivate lifecycle hook method.
Notice that the routerCanDeactivate method can return synchronously;
it returns true immediately if there is no crisis or there are no pending changes.
But it can also return a promise and the router will wait for that promise to resolve to truthy (navigate) or falsey (stay put).
Two critical points
The router hook is optional. We don't inherit from a base class. We simply implement the interface method or not.
We rely on the router to call the hook. We don't worry about all the ways that the user could navigate away. That's the router's job. We simply write this method and let the router take it from there.
The relevant Crisis Center code for this milestone is
Milestone #4: Query Parameters
We use route parameters to specify a parameterized value within the route URL
as we do when navigating to the HeroDetailComponent in order to view-and-edit the hero with id:15.
Sometimes we wish to add optional information to a route request.
For example, the HeroListComponent doesn't need help to display a list of heroes.
But it might be nice if the previously-viewed hero were pre-selected when returning from the HeroDetailComponent.
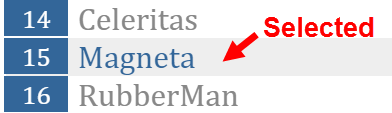
That becomes possible if we can include hero Magneta's id in the URL when we
return from the HeroDetailComponent, a scenario we'll pursue in a moment.
Optional information takes other forms. Search criteria are often loosely structured, e.g., name='wind*'.
Multiple values are common — after='12/31/2015' & before='1/1/2017' — in no particular order —
before='1/1/2017' & after='12/31/2015' — in a variety of formats — during='currentYear' .
These kinds of parameters don't fit easily in a URL path. Even if we could define a suitable URL token scheme, doing so greatly complicates the pattern matching required to translate an incoming URL to a named route.
The URL query string is the ideal vehicle for conveying arbitrarily complex information during navigation. The query string isn't involved in pattern matching and affords enormous flexiblity of expression. Almost anything serializable can appear in a query string.
The Component Router supports navigation with query strings as well as route parameters. We define query string parameters in the route parameters object just like we do with route parameters.
Route parameters object
When navigating to the HeroDetailComponent we specified the id of the hero-to-edit in the
route parameters object and made it the second item of the link parameters array.
The router embedded the id value in the navigation URL because we had defined it
as a route parameter with an :id placeholder token in the route path:
When the user clicks the back button, the HeroDetailComponent constructs another link parameters array
which it uses to navigate back to the HeroListComponent.
This array lacks a route parameters object because we had no reason to send information to the HeroListComponent.
Now we have a reason. We'd like to send the id of the current hero with the navigation request so that the
HeroListComponent can highlight that hero in its list.
We do that with a route parameters object in the same manner as before.
We also defined a junk parameter (foo) that the HeroListComponent should ignore.
Here's the revised navigation statement:
The application still works. Clicking "back" returns to the hero list view.
Look at the browser address bar. It should look something like this:
Unfortunately, the browser address bar does not change when running the live example in plunker.
You can take our word for it or
download the sample from within plunker, unzip it, and browse to index.html.
You may have to launch it in a local server such as
http-server or lite-server.
The id value appears in the query string (?id=15&foo=foo), not in the URL path.
The path for the "Heroes" route doesn't have an :id token.
The router replaces route path tokens with corresponding values from the route parameters object. Every parameter not consumed by a route path goes in the query string.
Query parameters in the RouteParams service
The list of heroes is unchanged. No hero row is highlighted.
The live example does highlight the selected row because it demonstrates the final state of the application which includes the steps we're about to cover. At the moment we're describing the state of affairs prior to those steps.
The HeroListComponent isn't expecting any parameters at all and wouldn't know what to do with them.
Let's change that.
When navigating from the HeroListComponent to the HeroDetailComponent
the router picked up the route parameter object and made it available to the HeroDetailComponent
in the RouteParams service. We injected that service in the constructor of the HeroDetailComponent.
This time we'll be navigating in the opposite direction, from the HeroDetailComponent to the HeroListComponent.
This time we'll inject the RouteParams service in the constructor of the HeroListComponent.
First we extend the router import statement to include the RouteParams service symbol;
Then we extend the constructor to inject the RouteParams service and extract the id parameter as the _selectedId:
All route parameters are strings.
The (+) in front of the routeParameters.get expression is a JavaScript trick to convert the string to an integer.
We add an isSelected method that returns true when a hero's id matches the selected id.
We update our template with a Class Binding to that isSelected method.
The binding adds the selected CSS class when the method returns true and removes it when false.
Look for it within the repeated <li> tag as shown here:
Finally, we add the selected class to our CSS styles
When the user navigates from the heroes list to the "Magneta" hero and back, "Magneta" appears selected:
The foo query string parameter is harmless and continues to be ignored.
Child Routers and Query Parameters
We can define query parameters for child routers too.
The technique is precisely the same. In fact, we made exactly the same changes to the Crisis Center feature. Confirm the similarities in these Hero and CrisisCenter components, arranged side-by-side for easy comparison:
When we navigate back from a CrisisDetailComponent that is showing the Asteroid crisis,
we see that crisis properly selected in the list like this:

Look at the browser address bar again. It's different. It looks something like this:
The query string parameters are no longer separated by "?" and "&". They are separated by semicolons (;) This is matrix URL notation — something we may not have seen before.
Matrix URL notation is an idea first floated in a 1996 proposal by the founder of the web, Tim Berners-Lee.
Although matrix notation never made it into the HTML standard, it is legal and it became popular among browser routing systems as a way to isolate parameters belonging to parent and child routes. The Angular Component Router is such a system.
The syntax may seem strange to us but users are unlikely to notice or care as long as the URL can be emailed and pasted into a browser address bar as this one can.
Wrap Up
As we end our chapter, we take a parting look at the entire application.
We can always try the live example and download the source code from there.
Our final project folder structure looks like this:
The top level application files are
Crisis Center
The Crisis Center feature area within the crisis-center folder follows:
Heroes
The Heroes feature area within the heroes folder is next:
Appendices
The balance of this chapter is a set of appendices that elaborate some of the points we covered quickly above.
The appendix material isn't essential. Continued reading is for the curious.
Link Parameters Array
We've mentioned the Link Parameters Array several times. We've used it several times.
We've bound the RouterLink directive to such an array like this:
We've written a two element array when specifying a route parameter like this
These two examples cover our needs for an app with one level routing. The moment we add a child router, such as the Crisis Center, we create new link array possibilities.
We specify a default child route for Crisis Center so this simple RouterLink is fine.
If we hadn't specified a default route, our single item array would fail because we didn't tell the router which child route to use.
We'd need to write our anchor with a link array like this:
Huh? Crisis Center, Crisis Center. This looks like a routing crisis!
But it actually makes sense. Let's parse it out.
- The first item in the array identifies the parent route ('CrisisCenter').
- There are no parameters for this parent route so we're done with it.
- There is no default for the child route so we need to pick one.
- We decide to go to the
CrisisListComponentwhose route name just happens also to be 'CrisisCenter' - So we add that 'CrisisCenter' as the second item in the array.
- Voila!
['CrisisCenter', 'CrisisCenter'].
Let's take it a step further. This time we'll build a link parameters array that navigates from the root of the application down to the "Princess Crisis".
- The first item in the array identifies the parent route ('CrisisCenter').
- There are no parameters for this parent route so we're done with it.
- The second item identifies the child route for details about a particular crisis ('CrisisDetail').
- The details child route requires an
idroute parameter - We add the "Princess Crisis" id as the third item in the array (
{id:1})
It looks like this!
We could redefine our AppComponent template with Crisis Center routes exclusively
Link Parameters Arrays in Redirects
What if we weren't constructing anchor tags with RouterLink directives?
What if we wanted to add a disaster route as part of the top-level router's configuration?
We can do that!
We compose a 3-item link parameters array following the recipe we just created.
This time we set the id to the "Asteroid Crisis" ({id:3}).
We can't define a normal route because that requires setting a target component. We're not defining a route to a component. We're defining a route to a route. A route to a route is a redirect. Here's the redirect route we'll add to our configuration.
We hope the picture is clear. We can write applications with one, two or more levels of routing. The link parameters array affords the flexibility to represent any routing depth and any legal sequence of route names and (optional) route parameter objects.
Appendix: Why use an ngOnInit method
We implemented an ngOnInit method in many of our Component classes.
We did so, for example, in the HeroDetailComponent.
We might have put the ngOnInit logic inside the constructor instead. We didn't for a reason. The reason is testability.
A constructor that has major side-effects can be difficult to test because it starts doing things as soon as we create a test instance. In this case, it might have made a request to a remote server, something it shouldn't do under test. It may even be impossible to reach the server in the test environment.
The better practice is to limit what the constructor can do. Mostly it should stash parameters in local variables and perform simple instance configuration.
Yet we want an instance of this class to get the hero data from the HeroService soon after it is created.
How do we ensure that happens if not in the constructor?
Angular detects when a component has certain lifecycle methods like ngOnInit and ngOnDestroy and calls them at the appropriate moment.
Angular will call ngOnInit when we navigate to the HeroDetailComponent, we'll get the id from the RouteParams
and ask the server for the hero with that id.
We too can call that ngOnInit method in our tests if we wish ... after taking control of the injected
HeroService and (perhaps) mocking it.
Appendix: Browser URL styles
When the router navigates to a new component view, it updates the browser's location and history with a URL for that view. This is a strictly local URL. The browser shouldn't send this URL to the server and should not reload the page.
Modern HTML 5 browsers support history.pushState, a technique that changes a browser's location and history without triggering a server page request. The router can compose a "natural" URL that is indistinguishable from one that would otherwise require a page load.
Here's the Crisis Center URL in this "HTML 5 pushState" style:
Older browsers send page requests to the server when the location URL changes ... unless the change occurs after a "#" (called the "hash"). Routers can take advantage of this exception by composing in-application route URLs with hashes. Here's a "hash URL" that routes to the Crisis Center
The Angular Component Router supports both styles with two LocationStrategy providers:
PathLocationStrategy- the default "HTML 5 pushState" style.HashLocationStrategy- the "hash URL" style.
The router's ROUTER_PROVIDERS array sets the LocationStrategy to the PathLocationStrategy,
making it the default strategy.
We can switch to the HashLocationStrategy with an override during the bootstrapping process if we prefer it.
Learn about "providers" and the bootstrap process in the Dependency Injection chapter
Which Strategy is Best?
We must choose a strategy and we need to make the right call early in the project. It won't be easy to change later once the application is in production and there are lots of application URL references in the wild.
Almost all Angular 2 projects should use the default HTML 5 style. It produces URLs that are easier for users to understand. And it preserves the option to do server-side rendering later.
Rendering critical pages on the server is a technique that can greatly improve perceived responsiveness when the app first loads. An app that would otherwise take ten or more seconds to start could be rendered on the server and delivered to the user's device in less than a second.
Thist option is only available if application URLs look like normal web URLs without hashes (#) in the middle.
Stick with the default unless you have a compelling reason to resort to hash routes.
HTML 5 URLs and the <base href>
While the router use the "HTML 5 pushState" style by default, we must configure that strategy with a base href
The preferred way to configure the strategy is to add a
<base href> element tag
in the <head> of the index.html.
Without that tag, the browser may not be be able to load resources (images, css, scripts) when "deep linking" into the app. Bad things could happen when someone pastes an application link into the browser's address bar or clicks such a link in an email link.
Some developers may not be able to add the <base> element, perhaps because they don't have
access to <head> or the index.html.
Those developers may still use HTML 5 URLs by taking two remedial steps:
- Provide the router with an appropriate
APP_BASE_HREFvalue. - Use absolute URLs for all web resources: css, images, scripts, and template html files.
Learn about the APP_BASE_HREF in the API Guide.
HashLocationStrategy
We can go old-school with the HashLocationStrategy by
providing it as the router's LocationStrategy during application bootstrapping.
First, import the provide symbol for Dependency Injection and the
Location and HashLocationStrategy symbols from the router.
Then override the default strategy defined in ROUTE_PROVIDERS by
providing the HashLocationStrategy later in the bootstrap providers array argument: