Having an existing Angular 1 application doesn't mean that we can't begin enjoying everything Angular 2 has to offer. That's beause Angular 2 comes with built-in tools for migrating Angular 1 projects over to the Angular 2 platform.
Some applications will be easier to upgrade than others, and there are ways in which we can make it easier for ourselves. It is possible to prepare and align Angular 1 applications with Angular 2 even before beginning the upgrade process. These preparation steps are all about making the code more decoupled, more maintainable, and up to speed with modern development tools. That means the preparation work will not only make the eventual upgrade easier, but will also generally improve our Angular 1 applications.
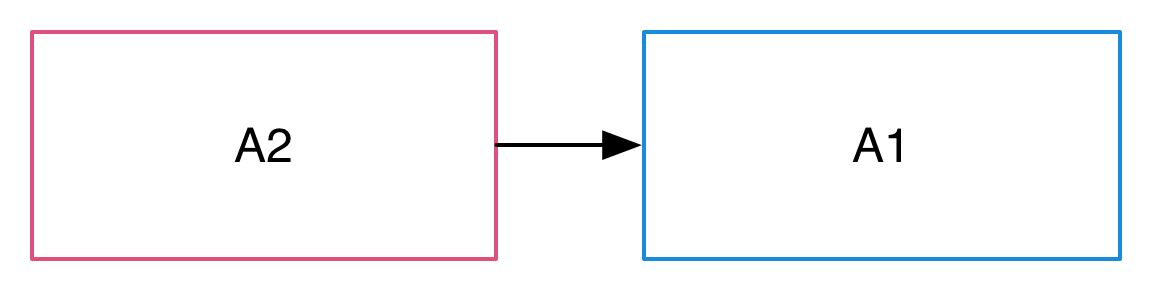
One of the keys to a successful upgrade is to do it incrementally,
by running the two frameworks side by side in the same application, and
porting Angular 1 components to Angular 2 one by one. This makes it possible
to upgrade even large and complex applications without disrupting other
business, because the work can be done collaboratively and spread over
a period of time. The upgrade module in Angular 2 has been designed to
make incremental upgrading seamless.
- Preparation
- Upgrading with The Upgrade Adapter
- How The Upgrade Adapter Works
- Bootstrapping Hybrid Angular 1+2 Applications
- Using Angular 2 Components from Angular 1 Code
- Using Angular 1 Component Directives from Angular 2 Code
- Projecting Angular 1 Content into Angular 2 Components
- Transcluding Angular 2 Content into Angular 1 Component Directives
- Making Angular 1 Dependencies Injectable to Angular 2
- Making Angular 2 Dependencies Injectable to Angular 1
Preparation
There are many ways to structure Angular 1 applications. When we begin to upgrade these applications to Angular 2, some will turn out to be much more easy to work with than others. There are a few key techniques and patterns that we can apply to future proof our apps even before we begin the migration.
Following The Angular Style Guide
The Angular Style Guide collects patterns and practices that have been proven to result in cleaner and more maintainable Angular 1 applications. It contains a wealth of information about how to write and organize Angular code - and equally importantly - how not to write and organize Angular code.
Angular 2 is a reimagined version of the best parts of Angular 1. In that sense, its goals are the same as the Angular Style Guide's: To preserve the good parts of Angular 1, and to avoid the bad parts. There's a lot more to Angular 2 than just that of course, but this does mean that following the style guide helps make your Angular 1 app more closely aligned with Angular 2.
There are a few rules in particular that will make it much easier to do
an incremental upgrade using the Angular 2 upgrade module:
- The Rule of 1 states that there should be one component per file. This not only makes components easy to navigate and find, but will also allow us to migrate them between languages and frameworks one at a time. In this example application, each controller, factory, and filter is in its own source file.
- The Folders-by-Feature Structure and Modularity rules define similar principles on a higher level of abstraction: Different parts of the application should reside in different directories and Angular modules.
When an application is laid out feature per feature in this way, it can also be migrated one feature at a time. For applications that don't already look like this, applying the rules in the Angular style guide is a highly recommended preparation step. And this is not just for the sake of the upgrade - it is just solid advice in general!
Using a Module Loader
When we break application code down into one component per file, we often end
up with a project structure with a large number of relatively small files. This is
a much neater way to organize things than a small number of large files, but it
doesn't work that well if you have to load all those files to the HTML page with
<script> tags. Especially when you also have to maintain those tags in the correct
order. That's why it's a good idea to start using a module loader.
Using a module loader such as SystemJS,
Webpack, or Browserify
allows us to use the built-in module systems of the TypeScript or ES2015 languages in our apps.
We can use the import and export features that explicitly specify what code can
and will be shared between different parts of the application. For ES5 applications
we can use CommonJS style require and module.exports features. In both cases,
the module loader will then take care of loading all the code the application needs
in the correct order.
When we then take our applications into production, module loaders also make it easier to package them all up into production bundles with batteries included.
Migrating to TypeScript
If part of our Angular 2 upgrade plan is to also take TypeScript into use, it makes sense to bring in the TypeScript compiler even before the upgrade itself begins. This means there's one less thing to learn and think about during the actual upgrade. It also means we can start using TypeScript features in our Angular 1 code.
Since TypeScript is a superset of ECMAScript 2015, which in turn is a superset
of ECMAScript 5, "switching" to TypeScript doesn't necessarily require anything
more than installing the TypeScript compiler and switching renaming files from
*.js to *.ts. But just doing that is not hugely useful or exciting, of course.
Additional steps like the following can give us much more bang for the buck:
- For applications that use a module loader, TypeScript imports and exports (which are really ECMAScript 2015 imports and exports) can be used to organize code into modules.
- Type annotations can be gradually added to existing functions and variables to pin down their types and get benefits like build-time error checking, great autocompletion support and inline documentation.
- JavaScript features new to ES2015, like
lets andconsts, default function parameters, and destructuring assignments can also be gradually added to make the code more expressive. - Services and controllers can be turned into classes. That way they'll be a step closer to becoming Angular 2 service and component classes, which will make our life easier once we do the upgrade.
Using Component Directives
In Angular 2, components are the main primitive from which user interfaces are built. We define the different parts of our UIs as components, and then compose the UI by using components in our templates.
You can also do this in Angular 1, using component directives. These are
directives that define their own templates, controllers, and input/output bindings -
the same things that Angular 2 components define. Applications built with
component directives are much easier to migrate to Angular 2 than applications
built with lower-level features like ng-controller, ng-include, and scope
inheritance.
To be Angular 2 compatible, an Angular 1 component directive should configure these attributes:
restrict: 'E'. Components are usually used as elements.scope: {}- an isolate scope. In Angular 2, components are always isolated from their surroundings, and we should do this in Angular 1 too.bindToController: {}. Component inputs and outputs should be bound to the controller instead of using the$scope.controllerandcontrollerAs. Components have their own controllers.templateortemplateUrl. Components have their own templates.
Component directives may also use the following attributes:
transclude: true, if the component needs to transclude content from elsewhere.require, if the component needs to communicate with some parent component's controller.
Component directives may not use the following attributes:
compile. This will not be supported in Angular 2.replace: true. Angular 2 never replaces a component element with the component template. This attribute is also deprecated in Angular 1.priorityandterminal. While Angular 1 components may use these, they are not used in Angular 2 and it is better not to write code that relies on them.
An Angular 1 component directive that is fully aligned with the Angular 2 architecture may look something like this:
Angular 1.5 introduces the component API that makes it easier to define directives like these. It is a good idea to use this API for component directives for several reasons:
- It requires less boilerplate code.
- It enforces the use of component best practices like
controllerAs. - It has good default values for directive attributes like
scope,restrict, andtransclude.
The component directive example from above looks like this when expressed using the component API:
Upgrading with The Upgrade Adapter
The upgrade module in Angular 2 is a very userful tool for upgrading
anything but the smallest of applications. With it we can mix and match
Angular 1 and 2 components in the same application and have them interoperate
seamlessly. That means we don't have to do the upgrade work all at once,
since there's a natural coexistence between the two frameworks during the
transition period.
How The Upgrade Adapter Works
The primary tool provided by the upgrade module is called the UpgradeAdapter.
This is a service that can bootstrap and manage hybrid applications that support
both Angular 2 and Angular 1 code.
When we use UpgradeAdapter, what we're really doing is running both versions
of Angular at the same time. All Angular 2 code is running in the Angular 2
framework, and Angular 1 code in the Angular 1 framework. Both of these are the
actual, fully featured versions of the frameworks. There is no emulation going on,
so we can expect to have all the features and natural behavior of both frameworks.
What happens on top of this is that components and services managed by one framework can interoperate with those from the other framework. This happens in three main areas: Dependency injection, the DOM, and change detection.
Dependency Injection
Dependency injection is front and center in both Angular 1 and Angular 2, but there are some key differences between the two frameworks in how it actually works.
| Angular 1 | Angular 2 |
|---|---|
Dependency injection tokens are always strings | Tokens can have different types. They are often classes. They may also be strings. |
There is exactly one injector. Even in multi-module applications, everything is poured into one big namespace. | There is a tree hierarchy of injectors, with a root injector and an additional injector for each component. |
Even accounting for these differences we can still have dependency injection
interoperability. The UpgradeAdapter resolves the differences and makes
everything work seamlessly:
- We can make Angular 1 services available for injection to Angular 2 code by upgrading them. The same singleton instance of each service is shared between the frameworks. In Angular 2 these services will always be in the root injector and available to all components. They will always have string tokens - the same tokens that they have in Angular 1.
- We can also make Angular 2 services available for injection to Angular 1 code by downgrading them. Only services from the Angular 2 root injector can be downgraded. Again, the same singleton instances are shared between the frameworks. When we register a downgrade, we explicitly specify a string token that we want to use in Angular 1.
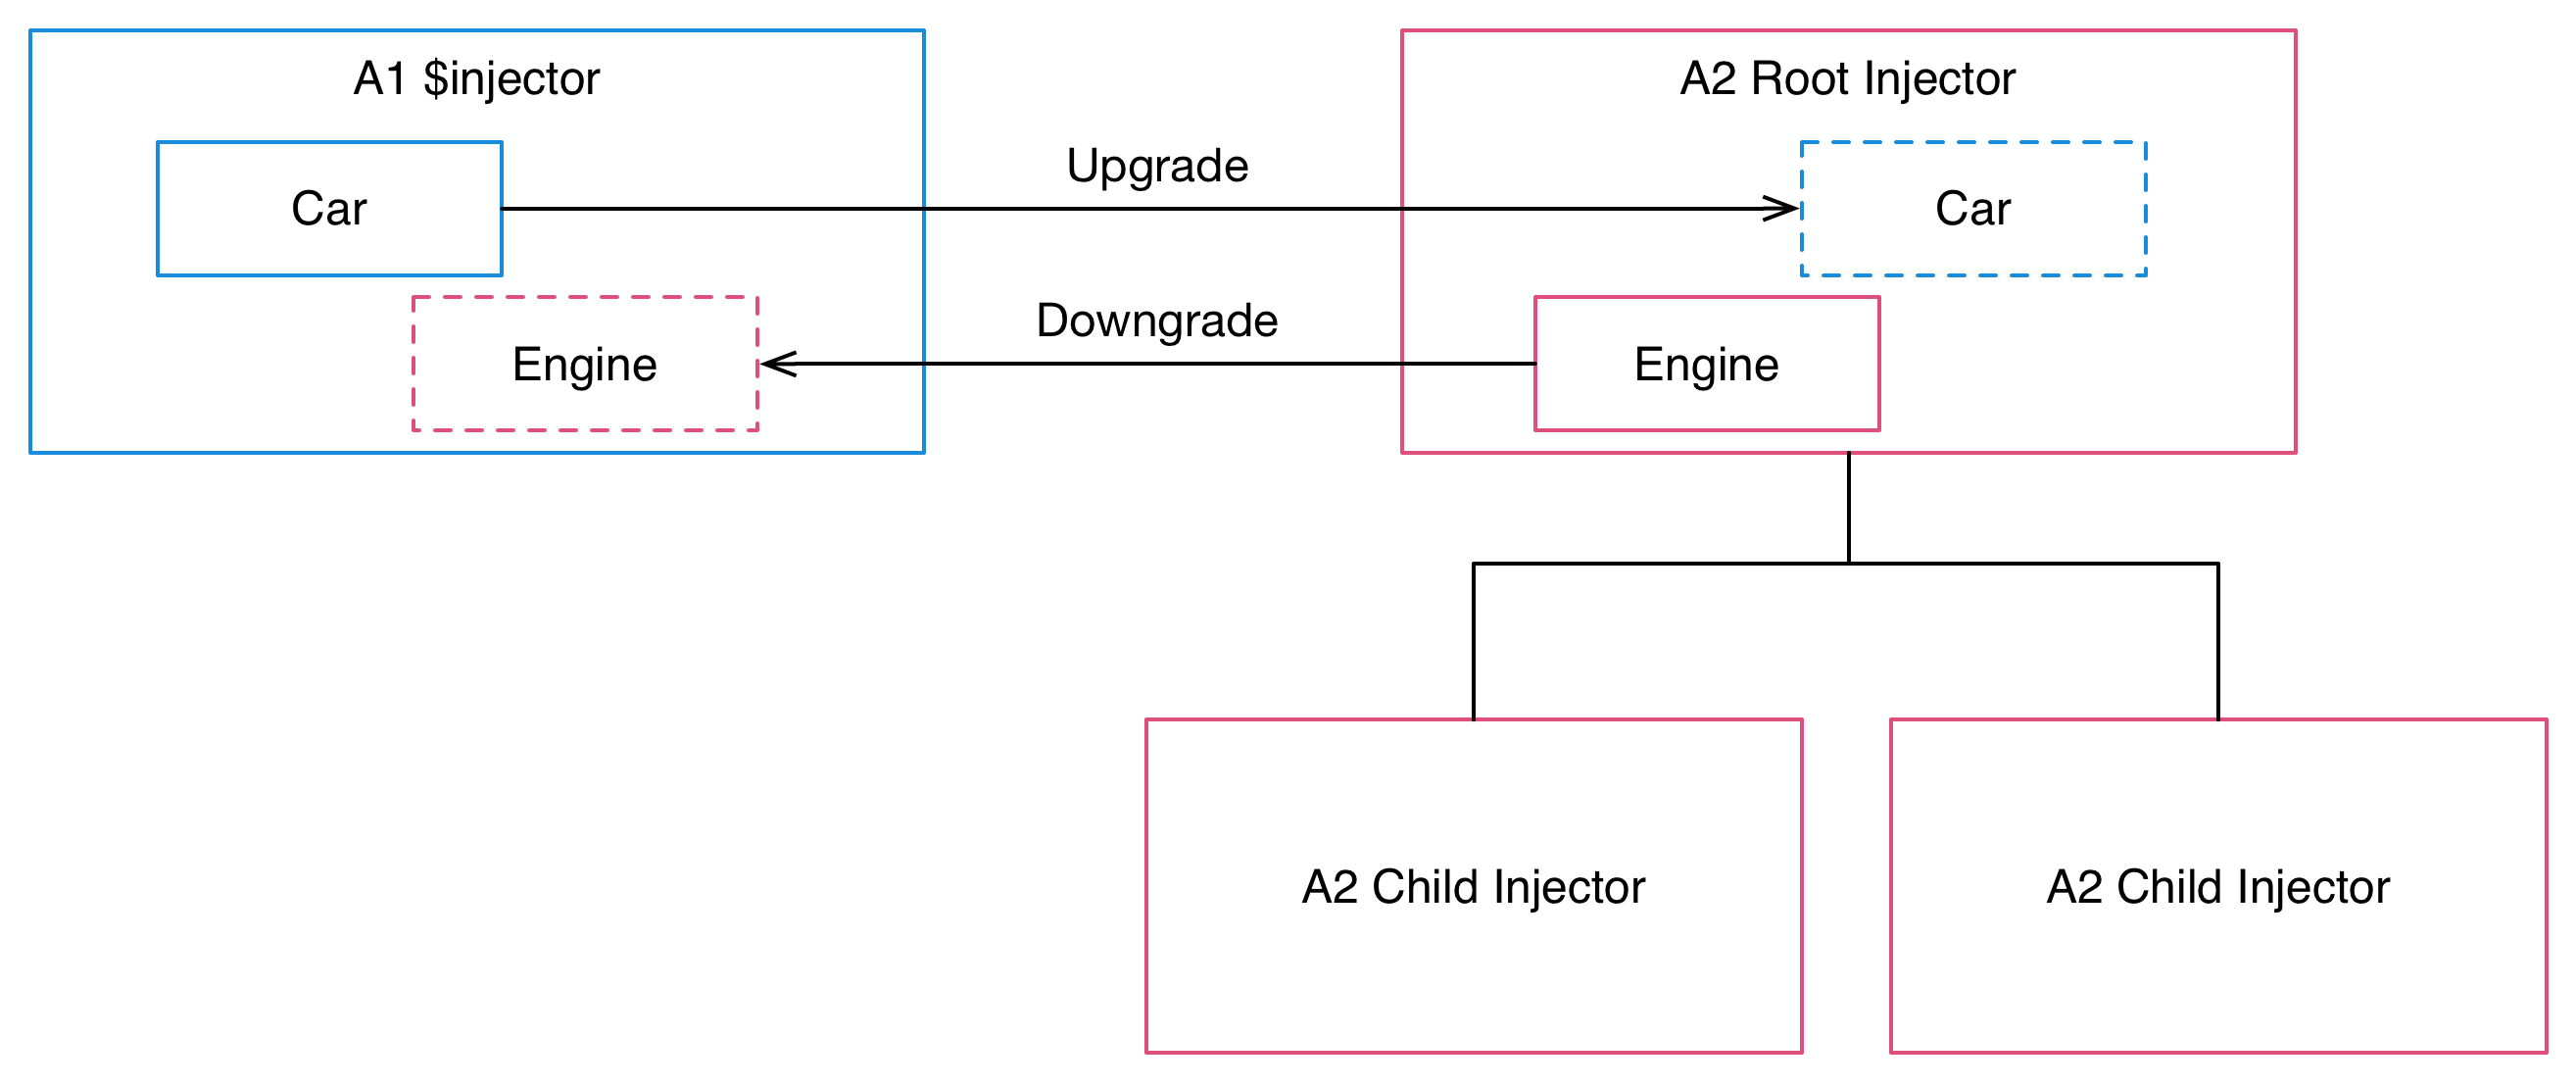
Components and the DOM
What we'll find in the DOM of a hybrid application are components and
directives from both Angular 1 and Angular 2. These components
communicate with each other by using the input and output bindings
of their respective frameworks, which the UpgradeAdapter bridges
together. They may also communicate through shared injected dependencies,
as described above.
There are two key things to understand about what happens in the DOM of a hybrid application:
- Every element in the DOM is owned by exactly one of the two frameworks. The other framework ignores it. If an element is owned by Angular 1, Angular 2 treats it as if it didn't exist, and vice versa.
- The root of the application is always an Angular 1 template.
So a hybrid application begins life as an Angular 1 application, and it is Angular 1 that processes its root template. Angular 2 then steps into the picture when an Angular 2 component is used somewhere in the application templates. That component's view will then be managed by Angular 2, and it may use any number of Angular 2 components and directives.
Beyond that, we may interleave the two frameworks as much as we need to. We always cross the boundary between the two frameworks by one of two ways:
- By using a component from the other framework: An Angular 1 template using an Angular 2 component, or an Angular 2 template using an Angular 1 component.
- By transcluding or projecting content from the other framework. The
UpgradeAdapterbridges the related concepts of Angular 1 transclusion and Angular 2 content projection together.
Whenever we use a component that belongs to the other framework, a switch between framework boundaries occurs. However, that switch only happens to the children of the component element. Consider a situation where we use an Angular 2 component from Angular 1 like this:
<ng2-component></ng2-component>
The DOM element <ng2-component> will remain to be an Angular 1 managed
element, because it's defined in an Angular 1 template. That also
means you can apply additional Angular 1 directives to it, but not
Angular 2 directives. It is only in the template of the Ng2Component
component where Angular 2 steps in. This same rule also applies when you
use Angular 1 component directives from Angular 2.
Change Detection
Change detection in Angular 1 is all about scope.$apply(). After every
event that occurs, scope.$apply() gets called. This is done either
automatically by the framework, or in some cases manually by our own
code. It is the point in time when change detection occurs and data
bindings get updated.
In Angular 2 things are different. While change detection still
occurs after every event, no one needs to call scope.$apply() for
that to happen. This is because all Angular 2 code runs inside something
called the Angular zone. Angular always
knows when the code finishes, so it also knows when it should kick off
change detection. The code itself doesn't have to call scope.$apply()
or anything like it.
In the case of hybrid applications, the UpgradeAdapter bridges the
Angular 1 and Angular 2 approaches. Here's what happens:
- Everything that happens in the application runs inside the Angular 2 zone. This is true whether the event originated in Angular 1 or Angular 2 code. The zone triggers Angular 2 change detection after every event.
- The
UpgradeAdapterwill invoke the Angular 1$rootScope.$apply()after every turn of the Angular zone. This also triggers Angular 1 change detection after every event.
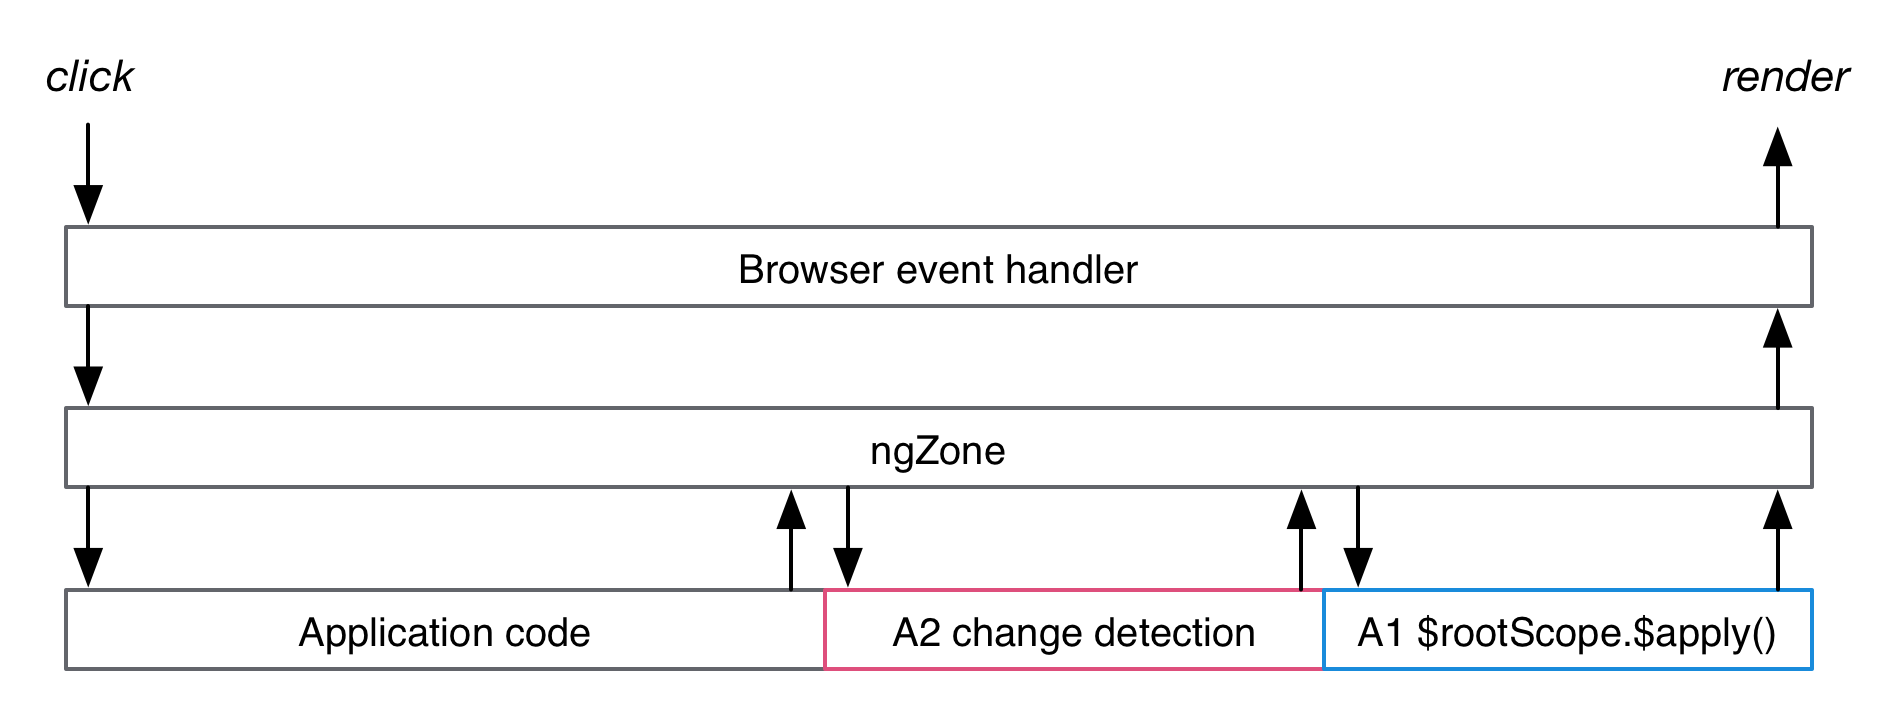
What this means in practice is that we do not need to call $apply() in
our code, regardless of whether it is in Angular 1 on Angular 2. The
UpgradeAdapter does it for us. We can still call $apply() so there
is no need to remove such calls from existing code. Those calls just don't
have any effect in a hybrid application.
When we downgrade an Angular 2 component and then use it from Angular 1, the component's inputs will be watched using Angular 1 change detection. When those inputs change, the corresponding properties in the component are set. We can also hook into the changes by implementing the OnChanges interface in the component, just like we could if it hadn't been downgraded.
Correspondingly, when we upgrade an Angular 1 component and use it from Angular 2,
all the bindings defined for the component directive's scope (or bindToController)
will be hooked into Angular 2 change detection. They will be treated
as regular Angular 2 inputs and set onto the scope (or controller) when
they change.
Bootstrapping Hybrid Angular 1+2 Applications
The first step to upgrading an application using the UpgradeAdapter is
always to bootstrap it as a hybrid that supports both Angular 1 and
Angular 2.
Pure Angular 1 applications can be bootstrapped in two ways: By using an ng-app
directive somewhere on the HTML page, or by calling
angular.bootstrap
from JavaScript. In Angular 2, only the second method is possible - there is
no ng-app in Angular 2. This is also the case for hybrid applications.
Therefore, it is a good preliminary step to switch Angular 1 applications to use the
JavaScript bootstrap method even before switching them to hybrid mode.
Say we have an ng-app driven bootstrap such as this one:
We can remove the ng-app and ng-strict-di directives from the HTML
and instead switch to calling angular.bootstrap from JavaScript, which
will result in the same thing:
To then switch the application into hybrid mode, we must first
install Angular 2 to the project. Follow the instructions in
the QuickStart for some pointers on this.
When we have Angular 2 installed, we can import and instantiate
the UpgradeAdapter, and then call its bootstrap method. It
is designed to take the exact same arguments as
angular.bootstrap
so that it is easy to make the switch:
At this point we'll be running a hybrid Angular 1+2 application! All the existing Angular 1 code will work as it always did, but we are now ready to run Angular 2 code as well.
One notable difference between angular.bootstrap and
upgradeAdapter.bootstrap is that the latter works asynchronously.
This means that we cannot assume that the application has been instantiated
immediately after the bootstrap call returns.
As we begin to migrate components to Angular 2, we'll be using the
UpgradeAdapter for more than just bootstrapping. It'll be important
to use the same instance of the adapter across the whole application,
because it stores internal information about what's going on in the application.
It'll be useful to have a module for a shared UpgradeAdapter instance in
the project:
This shared instance can then be pulled in to all the modules that need it:
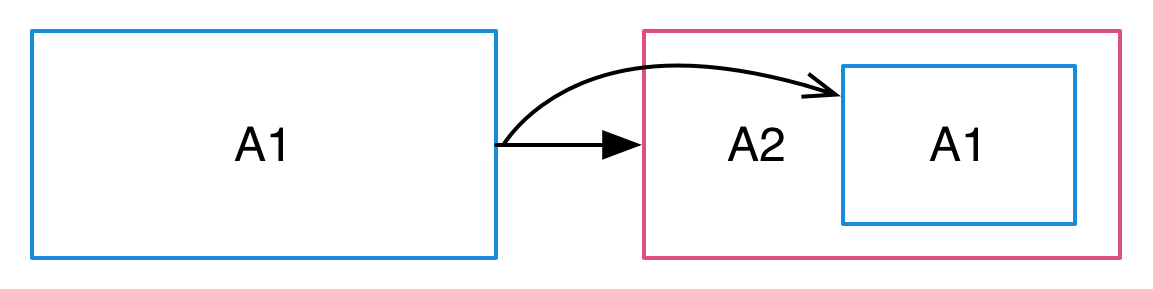
Using Angular 2 Components from Angular 1 Code
Once we're running a hybrid app, we can start the gradual process of upgrading code. One of the more common patterns for doing that is to use an Angular 2 component in an Angular 1 context. This could be a completely new component or one that was previously Angular 1 but has been rewritten for Angular 2.
Say we have a simple Angular 2 component that shows information about a hero:
If we want to use this component from Angular 1, we need to downgrade it using the upgrade adapter. What we get when we do that is an Angular 1 directive, which we can then register into our Angular 1 module:
What we have here is an Angular 1 directive called heroDetail, which we can
use like any other directive in our Angular 1 templates.
Note that since Angular 1 directives are matched based on their name,
the selector metadata of the Angular 2 component is not used in Angular 1.
It is matched as an element directive (restrict: 'E') called heroDetail.
Most components are not quite this simple, of course. Many of them have inputs and outputs that connect them to the outside world. An Angular 2 hero detail component with inputs and outputs might look like this:
These inputs and outputs can be supplied from the Angular 1 template, and the
UpgradeAdapter takes care of bridging them over:
Note that even though we are in an Angular 1 template, we're using Angular 2 attribute syntax to bind the inputs and outputs. This is a requirement for downgraded components. The expressions themselves are still regular Angular 1 expressions.
The $event variable can be used in outputs to gain access to the
object that was emitted. In this case it will be the Hero object, because
that is what was passed to this.deleted.emit().
Since this is an Angular 1 template, we can still use other Angular 1
directives on the element, even though it has Angular 2 binding attributes on it.
For example, we can easily make multiple copies of the component using ng-repeat:
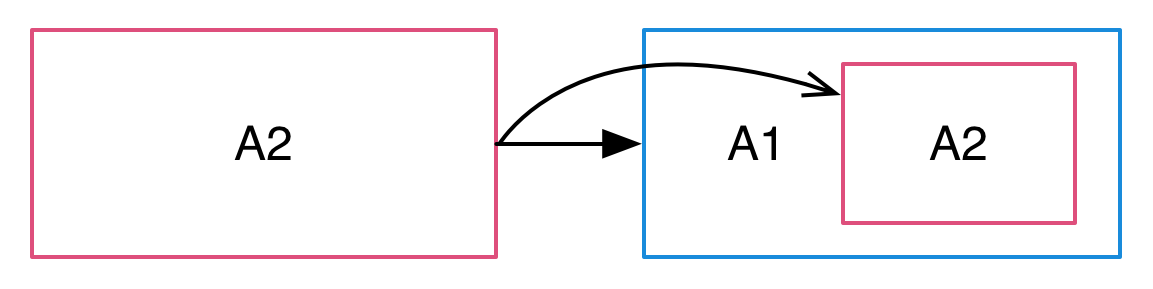
Using Angular 1 Component Directives from Angular 2 Code
So, we can write an Angular 2 component and then use it from Angular 1
code. This is very useful when we start our migration from lower-level
components and work our way up. But in some cases it is more convenient
to do things in the opposite order: To start with higher-level components
and work our way down. This too can be done using the UpgradeAdapter.
We can upgrade Angular 1 component directives and then use them from
Angular 2.
Not all kinds of Angular 1 directives can be upgraded. The directive really has to be a component directive, with the characteristics described in the preparation guide above. Our safest bet for ensuring compatibility is using the component API introduced in Angular 1.5.
A simple example of an upgradable component is one that just has a template and a controller:
We can upgrade this component to Angular 2 using the UpgradeAdapter's
upgradeNg1Component method. It takes the name of an Angular 1 component
directive and returns an Angular 2 component class. When we then
want to use it from an Angular 2 component, we list it the in the directives
metadata of the component and then just use it in the Angular 2 template:
Upgraded components always have an element selector, which is based on the original name of the original Angular 1 component directive.
An upgraded component may also have inputs and outputs, as defined by the scope/controller bindings of the original Angular 1 component directive. When we use the component from an Angular 2 template, we provide the inputs and outputs using Angular 2 template syntax, with the following rules:
| Binding definition | Template syntax | |
|---|---|---|
| Attribute binding |
|
|
| Expression binding |
|
|
| Two-way binding |
| As input: |
As an example, say we have a hero detail Angular 1 component directive with one input and one output:
We can upgrade this component to Angular 2, and then provide the input and output using Angular 2 template syntax:
Projecting Angular 1 Content into Angular 2 Components
When we are using a downgraded Angular 2 component from an Angular 1
template, the need may arise to transclude some content into it. This
is also possible. While there is no such thing as transclusion in Angular 2,
there is a very similar concept called content projection. The UpgradeAdapter
is able to make these two features interoperate.
Angular 2 components that support content projection make use of an <ng-content>
tag within them. Here's an example of such a component:
When using the component from Angular 1, we can supply contents for it. Just
like they would be transcluded in Angular 1, they get projected to the location
of the <ng-content> tag in Angular 2:
When Angular 1 content gets projected inside an Angular 2 component, it still remains in "Angular 1 land" and is managed by the Angular 1 framework.
Transcluding Angular 2 Content into Angular 1 Component Directives
Just like we can project Angular 1 content into Angular 2 components, we can transclude Angular 2 content into Angular 1 components, whenever we are using upgraded versions from them.
When an Angular 1 component directive supports transclusion, it may use
the ng-transclude directive in its template to mark the transclusion
point:
The directive also needs to have the transclude: true option enabled.
It is on by default for component directives defined with the
1.5 component API.
If we upgrade this component and use it from Angular 2, we can populate the component tag with contents that will then get transcluded:
Making Angular 1 Dependencies Injectable to Angular 2
When running a hybrid app, we may bump into situations where we need to have
some Angular 1 dependencies to be injected to Angular 2 code. This may be
because we have some business logic still in Angular 1 services, or because
we need some of Angular 1's built-in services like $location or $timeout.
In these situations, it is possible to upgrade an Angular 1 provider to
Angular 2. This makes it possible to then inject it somewhere in Angular 2
code. For example, we might have a service called HeroesService in Angular 1:
We can ugprade the service using the UpgradeAdapter's upgradeNg1Provider method
by giving it the name of the service. This adds the service into Angular 2's root injector.
We can then inject it in Angular 2 using a string token that matches its original name in Angular 1:
In this example we upgraded a service class, which has the added benefit that we can use a TypeScript type annotation when we inject it. While it doesn't affect how the dependency is handled, it enables the benefits of static type checking. This is not required though, and any Angular 1 service, factory, or provider can be upgraded.
Making Angular 2 Dependencies Injectable to Angular 1
In addition to upgrading Angular 1 dependencies, we can also downgrade Angular 2 dependencies, so that we can use them from Angular 1. This can be useful when we start migrating services to Angular 2 or creating new services in Angular 2 while we still have components written in Angular 1.
For example, we might have an Angular 2 service called Heroes:
We can again use the UpgradeAdapter for this, but first we need to register Heroes
to the Angular 2 injector itself. In a pure Angular 2 application we would do this
when we bootstrap the app, as described in the dependency injection guide.
But since hybrid applications are bootstrapped using the UpgradeAdapter, we also
need to register our Angular 2 providers using UpgradeAdapter. It has a method
called addProvider for this purpose.
Once we've registered the Angular 2 provider, we can turn Heroes into an Angular 1
factory function using upgradeAdapter.downgradeNg2Provider(). We can
then plug the factory into an Angular 1 module, at which point we also choose what the
name of the dependency will be in Angular 1:
After this, the service is injectable anywhere in our Angular 1 code:
PhoneCat Preparation Tutorial
In this section and the one following it we will look at a complete example of
preparing and upgrading an application using the upgrade module. The app
we're going to work on is Angular PhoneCat
from the original Angular 1 tutorial,
which is where many of us began our Angular adventures. Now we'll see how to
bring that application to the brave new world of Angular 2.
During the process we'll learn how to apply the steps outlined in the preparation guide in practice: We'll align the application with Angular 2 and also take both the SystemJS module loader and TypeScript into use.
To follow along with the tutorial, clone the angular-phonecat repository and apply the steps as we go
If you do clone this repository, note that it doesn't look like this guide assumes yet. There's a pull request that will change this. Meanwhile, you'll find a good starting point from this commit.
In terms of project structure, this is where our work begins
This is actually a pretty good starting point. In particular, this organization follows the Angular Style Guide, which is an important preparation step before a successful upgrade.
- Each controller, factory, and filter is in its own source file, as per the Rule of 1.
- The
core,phoneDetail, andphoneListmodules are each in their own subdirectory. Those subdirectories contain the JavaScript code as well as the HTML templates that go with each particular feature. This is in line with the Folders-by-Feature Structure and Modularity rules.
Switching to TypeScript And Module Loading
Since we're going to be writing our Angular 2 code in TypeScript, it makes sense to bring in the TypeScript compiler even before we begin upgrading.
In order to use TypeScript's ES2015 module system to import and export code, we're
going to need a JavaScript module loader. Our application doesn't currently
use one, and is just using plain old <script> tags and the global window scope
instead. We'll replace this approach with the
SystemJS loader.
Angular 2 itself doesn't require either TypeScript or SystemJS. There will soon be other editions of this guide that show how to do the upgrade using ES5.
We will also start to gradually phase out the Bower package manager in favor of NPM. We'll install all new dependencies using NPM, and will eventually be able to remove Bower from the project.
Let's begin by installing the SystemJS and TypeScript packages to the project:
npm i systemjs --save
npm i typescript --save-dev
The Angular 1 framework doesn't come with built-in TypeScript type definitions. This means that if we want to have type checks for the calls we make to Angular 1 APIs, we should install its type definitions separately. For that we'll use the tsd TypeScript definition manager. Let's make sure we have it globally installed:
npm i -g tsd
We can then use tsd to install the type definitions for Angular 1 and the Jasmine
unit test framework. This will add a typings directory to the project and install
a number of .d.ts files under it:
tsd install angular angular-route angular-resource angular-mocks jasmine
In index.html, let's now enable SystemJS. Add a <script> tag that loads
the SystemJS library and a second <script> tag that initializes it. These
will replace the various <script> tags we had earlier for loading the
application components:
This configuration tells SystemJS that we have a module called app.module that
resides in the js subdirectory (relative to the index.html page). We then load that
module using System.import. This will load and execute the app/app.module.js file.
We should also configure the TypeScript compiler so that it can understand our
project. We'll add a tsconfig.json file to the project directory, just like we did
in the Quickstart. It instructs the TypeScript compiler how
to interpret our source files.
We are telling the TypeScript compiler to turn our TypeScript files to ES5 code bundled into SystemJS modules. In other words, our compiler target is something SystemJS can load and all major browsers are able to run.
Also add a tsc run script to package.json. We'll use it to start the TypeScript
compiler:
We can now launch the TypeScript compiler from the command line. It will watch
our .ts source files and compile them to JavaScript on the fly. Those compiled
.js files are then loaded into the browser by SystemJS. This is a process we'll
want to have continuously running in the background as we go along.
npm run tsc
The next thing we'll do is convert our JavaScript files to TypeScript and define
their imports and exports. Each file should now explicitly export the things
it wants to expose, and import the things it needs from other files. This is a
departure from the previous approach which just relied on things being available
on the global window scope.
Since TypeScript is a superset of ECMAScript 2015, which in turn is a superset
of ECMAScript 5, we can simply switch the file extensions from .js to .ts
and define the imports and exports. We don't need to make other changes to
our existing code. Instead we'll introduce type annotations and other new
features gradually over time.
Let's begin by adding references to the Angular 1.x .d.ts typing files to the
main application file. Rename app.module.js to app.module.ts and add the following on top
of the file:
The TypeScript compiler will now know what we mean when we reference
Angular 1 APIs. It should already at this point be able to compile the
app.module.ts file successfully.
Let's then go through the rest of our source files and convert them.
We'll rename each one to a .ts file, and add the imports and exports it needs.
Beginning from the checkmark filter, here are the converted contents:
This file now has the filter factory function as the default export. Apart from
the export, there's one other major change we've applied to the file, which
is that it does not contain the registration of the filter into an Angular
module. We will do that later in the core module's main file.
Moving to the Phone factory file, it now has the factory function as the default
export:
The core module's main module file will now import both the checkmark filter
and the Phone factory. This is where we actually register them into the Angular module.
We then export the module itself as this file's default export:
Notice that with this organization pattern, the files that hold the application components themselves - filters and factories - aren't concerned with the makeup of Angular modules. That's just something we previously had to do because there were no other good solutions. Now we use a separate file just for the purpose of forming the Angular module.
Now switching to the phone detail module, we'll make similar changes here. In the controller file we export the controller function as the default export:
In the main module file we import the controller and register it into the Angular module, which itself is then exported:
Then we'll repeat the same steps once more for the phone list module. The controller file exports the controller function:
And the main module file imports the controller and registers it:
Finally, we can now pull everything together in app.module.ts. It here we'll
import each of the three submodule files and register them as dependencies
of the main application module:
Note that we don't have to repeat the submodule name strings here. Since the
modules export themselves, we can just refer to the name attribute of each
of them.
Before this converted version of the application will run, we need to change the
way we're bootstrapping it. It is currently bootstrapped using the ng-app directive
attached to the <html> element of the host page. This will no longer work because
ng-app is processed when the page loads, and our application code will not
be available at that point yet. It is loaded asynchronously by SystemJS instead.
We should switch to a JavaScript-driven bootstrap instead. As it happens, this is
also how Angular 2 apps are bootstrapped, so the switch brings us one step closer
to Angular as well. So, remove the ng-app attribute from index.html, and add
this at the end of app.module.ts:
We now have a fully functional version of the application, all converted
into TypeScript code and a modern module system! If you start the project HTTP
server with npm start, you should see the fully functional application in
your browser. On the other hand, if you were to try running the test suite,
things wouldn't look quite that good yet. We also have to make our tests
support our new module organization.
Preparing Unit and E2E Tests
Our project has both E2E Protractor tests and some Karma unit tests in it. Both of those are going to need a bit of work.
Of these two, E2E tests are a lot easier to convert. By definition, E2E tests access our application from the outside by interacting with the various UI elements the app puts on the screen. E2E tests aren't really that concerned with the internal structure of the application components. That also means that although we've modified our project quite a bit, the E2E test suite should keep passing just as it was before. We haven't changed how the app behaves from the user's point of view.
What we can do is convert our E2E test code to TypeScript, like we've
done with the production code. To do this, you can just rename the
scenarios.js file to scenarios.ts. After that, you'll want to declare
the global Protractor variables used in the file, so that the TypeScript
compiler knows we're accessing them on purpose:
Once we add Angular 2 to the project, we'll be able to add more type safety to this file, because Angular 2 ships with the type definitions of the Protractor framework as well.
That pretty much takes care of E2E tests for now. For unit tests we're going
to do a bit more. What we'll do is convert our existing unit tests to TypeScript
as well as have them use imports to load in the code they need. We'll also need
to tweak our Karma configuration so that it'll let SystemJS load the application
files.
But first we should have some additional type definitions loaded, so that the TypeScript
compiler can understand the Jasmine and ngMock APIs we're using in unit tests.
Add a file called test_helper.ts to the test directory and add a reference
to the Jasmine and mock type definitions we already installed earlier:
For Karma's SystemJS support we'll use a shim file that will tweak the way files get loaded, so that it happens through SystemJS:
We'll then update the Karma configuration file, so that it loads SystemJS and the shim file. We'll also change how the app and unit tests files themselves are loaded. We will watch them so that the test suite is triggered when changes occur, but we won't have Karma include them because that is now done by SystemJS and the shim.
Now we have the infrastructure in place and can convert the test files themselves. This mainly just consists for changing the file extensions of those files, and adding the necessary imports to them.
In the checkmark filter spec, we'll import the core module file, so that it is available when we load the corresponding Angular module:
We'll do the exact same thing for the phone factory spec:
In the phone detail controller spec, on the other hand, we should import the phone detail module:
Finally, the phone list controller spec should import the phone list module:
There's one more issue we have in our controller tests, which is that TypeScript
isn't happy about compiling them at the moment. This is because we're using
the custom Jasmine matcher toEqualData in both of them. Because this is something
we define ourselves, it isn't included in the Jasmine type definitions that we
installed using tsd.
We can add our own little type definition file for that extension, which extends
the jasmine.Matchers interface and adds our custom matcher to it. This will
satisfy the compiler and let us use our custom matcher while retaining the nice
type safety features of TypeScript:
And now we have a fully functional test suite for our TypeScript-enabled application as well.
Enjoying The Benefits of TypeScript
Now that we have TypeScript, we can start benefiting from some of its other features in addition to the imports and exports that we're already using. There's a lot of value the language can provide in Angular 1 applications.
For one thing, TypeScript is a superset of ES2015. Any app that has previously
been written in ES5 - like the PhoneCat example has - can with TypeScript
start incorporating all of the JavaScript features that are new to ES2015.
These include things like lets and consts, default function parameters,
and destructuring assignments.
Another thing we can do is start adding type safety to our code, by adding type annotations. For instance, we can annotate the checkmark filter so that it expects booleans as arguments and returns strings. This makes it clearer what the filter is supposed to do, and makes it possible for the TypeScript compiler to notify us when we're trying to use it with incompatible types.
The Angular 1.x type definitions we installed from TSD are not officially maintained by the Angular team, but are quite comprehensive. Though we're not going to do it in this tutorial, it is possible to make an Angular 1.x application fully type-annotated with the help of these definitions.
If this is something we wanted to do, it would be a good idea to enable
the noImplicitAny configuration option in tsconfig.json. This would
cause the TypeScript compiler to display a warning when there's any code that
does not yet have type annotations. We could use it as a guide to inform
us about how close we are to having a fully annotated project.
Another TypeScript feature we can make use of is classes. In particular, we can turn our controllers into classes. That way they'll be a step closer to becoming Angular 2 component classes, which will make our life easier once we do the upgrade.
Angular 1 expects controllers to be constructor functions. That's what ES2015/TypeScript classes really are, so that means we can just register a class as a controller and Angular 1 will happily use it. We also won't need to make any changes to our test suite as the external behavior of the controllers will not change.
Here's what our new class for the phone list controller looks like.
What was previously done in the controller function is now done in the class constructor function. The class additionally declares three members: The array of phones, the name of the current sort key, and the search query. These are all things we have already been attaching to the controller, but that weren't explicitly declared anywhere. The last one of these isn't actually used in the TypeScript code since it's only referred to in the template, but for the sake of clarity we want to define all the members our controller will have.
In the Phone detail controller we'll have two members: One for the phone
that the user is looking at and another for the URL of the currently displayed image.
We can additionally introduce a TypeScript interface that explicitly defines
what we expect the $routeParams object to contain when it is
passed to the controller. This interface is not exported and is just used internally
inside this module:
This makes our controller code look a lot more like Angular 2 already. We're all set to actually introduce Angular 2 into the project.
If we had any Angular 1 services in the project, those would also be
a good candidate for converting to classes, since like controllers,
they're also constructor functions. But we only have the Phone factory
in this project, and that's a bit special since it's an ngResource
factory. So we won't be doing anything to it in the preparation stage.
We'll instead turn it directly into an Angular 2 service in the
next section.
PhoneCat Upgrade Tutorial
Having completed our preparation work, let's get going with the Angular 2 upgrade of PhoneCat. We'll do this incrementally with the help of the upgrade module that comes with Angular 2. By the time we're done, we'll be able to remove Angular 1 from the project completely, but the key is to do this piece by piece without breaking the application.
Let's install Angular 2 into the project. Add the Angular 2 dependencies
to package.json as described in the package.json appendix of the
Quickstart.
Then run:
npm i
We can then load Angular 2 into the application by adding some <script>
tags to index.html. They should go before the <script> tag that has the
System.config() invocation:
The first two scripts are for adding some ES6 features to older browsers that don't natively support them. The last three bring in Angular 2 itself.
While we're at it, let's also load the same files into unit tests by updating the Karma config:
After installing Angular 2, the TypeScript compiler will complain
about a clash in the global $ variable: The jQuery typings used
by the Angular 1 typings introduce one, and the Protractor typings
used by Angular 2 introduce another. This will be resolved in a
later release. See issue #5459
for some workarounds.
Bootstrapping A Hybrid 1+2 PhoneCat
What we'll do next is bootstrap the application as a hybrid application that supports both Angular 1 and Angular 2 components. Once we've done that we can start converting the individual pieces to Angular 2.
At this point we need to do add the Angular 2 type definitions
into app.ts, so that the TypeScript compiler knows what we're talking about
when we use Angular 2 APIs. Unlike with Angular 1, we don't need to install
or refer to these type definitions in our source code, because Angular 2
comes with them included. What we do need to do is set the TypeScript
compiler's moduleResolution option to node, so that it knows to look
for these definitions from the angular2 NPM package.
Angular 2 bundles the Jasmine type definitions we need in tests, which means
that the Jasmine type definitions we installed with tsd are now redundant.
We might as well remove them so that there's no confusion about which ones
we're using.
rm -r typings/jasmine
Also remove the reference to those type definitions from
test/test_helper.ts.
The same also goes for Protractor: Angular 2 comes with the types of the
Protractor APIs, so it's safe to remove the declare var line from
scenarios.ts.
To boostrap a hybrid application, we first need to initialize an UpgradeAdapter,
which provides the glue that joins the two
versions of the framework together. Let's import the UpgradeAdapter class into
app.module.ts:
We can then make an adapter by instantiating the class:
Now we can use that adapter to bootstrap our application as a hybrid.
Instead of calling angular.bootstrap, we must call
upgradeAdapter.bootstrap, but the function arguments remain the same:
They are still the element that will become the root of the application,
and the names of the root Angular 1.x modules that we want to include:
We are now running both Angular 1 and 2 at the same time. That's pretty exciting! We're not running any actual Angular 2 components yet though, so let's do that next.
Upgrading the Phone factory
The first piece we'll port over to Angular 2 is the Phone factory, which
resides in app/js/core/phones.factory.ts and makes it possible for controllers
to load phone information from the server. Right now it's implemented with
ngResource and we're using it for two things:
- For loading the list of all phones into the phone list controller
- For loading the details of a single phone into the phone detail controller.
We can replace this implementation with an Angular 2 service class, while
keeping our controllers in Angular 1 land. In the new version we'll just use
the the Http service from Angular 2 instead of ngResource.
The Http service isn't included in the main Angular 2 bundle, so we need to
include it in index.html separately. As the service uses RxJS Observables,
we also need to bring in the RxJS bundle:
We'll also do the same in karma.conf.js so that Http will be available in
unit tests:
Before the Http service is available for injection, we still need to register
it into our application's dependency injector. We should import the HTTP_PROVIDERS
constant in app.module.ts:
In a regular Angular 2 application we would now pass HTTP_PROVIDERS into
the application bootstrap function. But we can't do that in a hybrid
application such as the one we're working on. That's because the bootstrap
method of UpgradeAdapter expects Angular 1 modules as dependencies,
not Angular 2 providers.
What we must do instead is register HTTP_PROVIDERS into the UpgradeAdapter
separately. It has a method called addProvider for that purpose:
Now we're ready to upgrade the Phones factory itself. We'll put the Angular 2
implementation in a new file called Phones.ts in the core module. It will be a TypeScript
class decorated as @Injectable:
Note that with Angular 2 we're switching to a new file naming scheme, and
won't be using the feature.type.ts naming convention anymore.
The @Injectable decorator will attach some dependency injection metadata
to the class, letting Angular 2 know about its dependencies. As described
by our Dependency Injection Guide,
this is a marker decorator we need to use for classes that have no other
Angular 2 decorators but still need to have their dependencies injected.
In its constructor the class expects to get the Http service. It will
be injected to it and it is stored as a private field. The service is then
used in the two instance methods, one of which loads the list of all phones,
and the other the details of a particular phone:
The methods now return Observables of type Phone and Phone[]. This is
a type we don't have yet, so let's add a simple interface for it:
Here's the full, final code for the service:
Notice that we're importing the map operator of the RxJS Observable separately.
We need to do this for all RxJS operators that we want to use, since Angular 2
does not load all of them by default.
The new Phones service now has the same features that the original, ngResource based
service did. You can remove the old phones.factory.ts file. Now we just
need to register the new service into the application, so that our Angular 1
controllers will be able to use it.
UpgradeAdapter has a downgradeNg2Provider method for the purpose of making
Angular 2 services available to Angular 1 code. The problem is that we don't have
our UpgradeAdapter available in core.module.ts where the Phones service should
be registered. We only have it in app.module.ts. There should only be one
UpgradeAdapter in an application, so we need to find a way to share our
instance between the two code modules.
What we'll do is create a new module that instantiates UpgradeAdapter
and exports the instance. We can then just pull it in wherever we need it,
so that we're using the same object everywhere. Let's put this new file
under core:
In app.module.ts we should now just import this adapter instead of making a separate one:
Also remove the line from app.module.ts that is instantiating UpgradeAdapter. It's no
longer needed since we import the instance from elsewhere.
We'll then do the same in core.module.ts as well. Then we can register the Phones service into it.
While doing that, we can remove the module's dependency to ngResource, which
we're no longer using.
Note that we actually needed to do two registrations here:
- Register
Phonesas an Angular 2 provider with theaddProvidermethod. That's the same method that we used earlier forHTTP_PROVIDERS. - Register an Angular 1 factory called
phones, which will be a downgraded version of thePhonesservice.
At this point we can switch our two controllers to use the new service
instead of the old one. We $inject it as the downgraded phones factory,
but it's really an instance of the Phones class and we can annotate its type
accordingly:
What we have here are two Angular 1 controllers using an Angular 2 service! The controllers don't need to be aware of this, though the fact that the service returns Observables and not Promises is a bit of a giveaway. In any case, what we've achieved is a migration of a service to Angular 2 without having to yet migrate the controllers that use it.
You could use the toPromise method of Observable to turn those Observables
into Promises in the service to further reduce the amount of changes
needed in controller code.
To bring our test suite up to speed with the changes, we should first enable
the Angular 2 test support library in our unit test suite. We first need to
add the angular testing bundle to list of files that Karma is loading:
Then we'll update the Karma test shim. It should load the Angular 2 browser adapter before getting to the spec files:
Now, let's look at the tests for the service itself. What we used to have in
phones_factory_spec.js was a fairly simple test that simply checks if
the factory exists and is available for injection. We can now do that same
test in Angular 2. Rename phones.factory.spec.ts to Phones.spec.ts and
set the contents as follows:
Here we first load the Phones provider and then test that an instance of
Phones can in fact be injected. We also need to load HTTP_PROVIDERS since
it is a dependency of Phones.
For the controller tests, we can first of all at this point get rid of the
custom toEqualData custom matcher. It was added because ngResource attaches
attributes to the data that we don't want to compare in tests. We're no longer
using ngResource, so we can simply use the built-in toEqual for comparisons.
This means we can remove the test/jasmine_matchers.d.ts file at this point.
Now, in the phone detail controller we have been testing that the phone details
with the id given in the route params are fetched over HTTP and put on the
scope. We can continue doing that, but we'll need to change the structure of the
test a bit. Instead of using the Angular 1 mock HTTP backend, we'll just mock out
the get method of the Phones service, which is what the controller is now
using to load what it needs. As the mocked value, we're returning an Observable
that will emit a single value - the mock phone data:
We're doing a manual Phones instantiation because hybrid apps can't be
bootstrapped for unit tests at the moment, which means that Angular 2
dependencies can't be made available. This is likely to change.
In the phone list controller we'll do something very similar: We mock out the query
method of the Phones service, and check that the controller makes the resulting
value available:
Upgrading Controllers to Components
Next, let's upgrade our Angular 1 controllers to Angular 2 components. We'll do it one at a time, while still keeping the application in hybrid mode. As we make these conversions, we'll also be defining our first Angular 2 pipes.
Let's look at the phone list controller first. Right now it is a TypeScript class,
which is paired with an HTML template by the route configuration in app.ts.
We'll be turning it into an Angular 2 component.
Rename phone_list.controller.ts to PhoneList.ts. Then rename the controller class
inside to just PhoneList and decorate it as a @Component:
The selector attribute is a CSS selector that defines where on the page the component
should go. It will match elements by the name of pc-phone-list. It is a good idea
to always use application-specific prefixes in selectors so that they never clash with
built-in ones, and here we're using pc-, which is short for "PhoneCat".
The templateUrl defines the location of the component template. It points to our existing
template file
Both of these attributes are things that were defined externally for the controller, but for the component are things that it defines itself. This will affect how we use the component in the router.
We now also need to convert the template of this component into Angular 2 syntax.
In the search controls we need to use Angular 2 syntax for the two ngModels
In the list we need to replace the ng-repeat with an *ngFor and its
#var of iterable syntax, which is described in our
Template Syntax guide.
For the images, we can replace ng-src with the standard src, but will use a
property binding. Note that we're also adding a name CSS class for the phone name.
This is something we'll need for our Protractor tests:
In the module file we're going to plug this component into our application. Instead
of registering a controller, we register a pcPhoneList directive.
The directive is a downgraded version of our component, and the UpgradeAdapter
handles the bridging between the two:
The <angular.IDirectiveFactory> type annotation here is to let the TypeScript compiler
know that the return value of the downgrade method call will be something that can be
used as a directive factory.
To complete the switch, we should change our route configuration in app.module.ts.
Instead of using the controller and template, it can just instantiate our component.
We can do that by using a simple template that uses the directive
we just registered:
When the application runs, the Angular 1.x directive compiler will match
the element in the template to the pcPhoneList directive, which is actually
an Angular 2 component!
The remaining issue with the phone list is the use of filters in its
template: It is referring to the filter filter and the orderBy filter,
and relying on them to filter and sort the phone list, respectively.
These pipes do not exist in Angular 2, so we're going to need to do
the filtering and sorting ourselves. Let's define a couple of pipes that
get the job done.
If you want to learn more about how pipes in Angular 2 work, we have a whole guide on the subject available!
For filtering, we'll have a pipe called PhoneFilterPipe. It works like
the filter filter in Angular 1 in that it filters a collection of objects,
matching properties within the objects. But, as opposed to filter,
this pipe is specialized to filter Phone objects and we can use
type annotations to make this explicit:
Since we're adding new code, it's a good idea to add some unit tests for
it too. Here are a few tests for PhoneFilterPipe:
For sorting, we'll use a more generic pipe, just called OrderBy. It
takes an array of objects, and a property to order the array by. It returns
an array of the same type of thing it was given. In the implementation we
copy the input array, sort the copy, and return it.
Here's a unit test for OrderByPipe as well:
We can now integrate these new pipes with our component. Before the pipes
are available there, we need to declare them in the @Component decorator.
In the template we need to use the phoneFilter pipe instead of filter.
No changes are needed for the orderBy
Now that the phone list is an Angular 2 component, there's one more neat trick
we can apply to make its code a little bit simpler. Earlier, as we upgraded
the Phones service, we needed to add a subscribe callback to the list
response, which populated the phones array on the component.
With Angular 2, we can instead just put the Observable itself on the
component, and can skip the subscription callback:
This is made possible by the async pipe, which we can apply in the template.
It knows how to turn an Observable to the (latest) value it has emitted:
That takes care of the phone list. Here's the updated unit test file for that component to complete the migration:
Before this test will run, we'll need to augment our Karma configuration so that component HTML templates are loaded properly. We didn't need them before when we were testing the controller in isolation, but our new test exercises the component as a whole, which includes the template.
Now we can start looking at our other controller, which is the one for
the phone details. Rename phone_detail.controller.ts to PhoneDetail.ts, and set the
contents as follows:
This is pretty similar to what we did with the phone list. The one new change
here is the use of @Inject for the $routeParams dependency. It tells the
Angular 2 injector what this dependency should map to. We have a dependency called
$routeParams in the Angular 1 injector, where it is provided by the Angular 1 router.
That is what we were already using when PhoneDetails was still an Angular 1 controller.
The things is though, Angular 1 dependencies are not made automatically available to
Angular 2 components, so if we were to run this now, it would not work.
We explicitly need to tell the UpgradeAdapter to upgrade $routeParams so that
it is available for injection in Angular 2. We can do it in app.module.ts:
We now also need to convert the template of this component into Angular 2 syntax. Here is the new template in its entirety:
There are several notable changes here:
- We've removed the
vm.prefix from all expressions. - Just like we did in the phone list, we've replaced
ng-srcwith property bindings for the standardsrc. - We're using the property binding syntax around
ng-class. Though Angular 2 does have a very similarngClassas Angular 1 does, its value is not magically evaluated as an expression. In Angular 2 we always specify in the template when an attribute's value is a property expression, as opposed to a literal string. - We've replaced
ng-repeats with*ngFors. - We've replaced
ng-clickwith an event binding for the standardclick. - In all references to
phone, we're using the elvis operator?.for safe property navigation. We need it because when the component first loads, we don't havephoneyet and the expressions will refer to a non-existing value. Unlike in Angular 1, Angular 2 expressions do not fail silently when we try to refer to properties on undefined objects. We need to be explicit about cases where this is expected.
In the module file we'll now register a pcPhoneDetail directive instead of a
controller. The directive is a downgraded version of the PhoneDetail component.
In the router configuration in app.module.ts, we'll switch the details route to
instantiate a component as well:
There's one additional step we need to take, which is to upgrade the
checkmark filter that the template is using. We need an Angular 2
pipe instead of an Angular 1 filter.
While there is no upgrade method in the upgrade adapter for filters, we
can just turn the filter function into a class that fulfills
the contract for Angular 2 Pipes. The implementation is the same as before.
It just comes in a different kind of package. While changing it, also
rename the file to CheckmarkPipe.ts:
As we apply this change, we should also remove the registration of the filter from the core module file. The module's content becomes:
The unit test file for the filter also now becomes the unit test filter for the pipe. While we're still testing the same thing, we need to change how we set things up:
In the component we should now import and declare our newly created pipe:
With the phone detail component now migrated as well, we can go and migrate its unit tests too.
As we discussed earlier, Protractor tests should largely remain functional
as we are making changes, since we're not really changing the user-visible
behavior of the application. Now that we've migrated some components and
their templates, however, there are a few changes we need to make. Apply
the following replacements to scenarios.ts:
| Previous code | New code | Notes |
|---|---|---|
|
| The repeater matcher relies on Angular 1 |
|
| The repeater matcher relies on Angular 1 |
|
|
| The model matcher relies on Angular 1 |
|
| The model matcher relies on Angular 1 |
|
| The binding matcher relies on Angular 1 data binding |
|
| Angular 2 may inject empty |
Switching To The Angular 2 Router And Bootstrap
At this point we've replaced all our Angular 1 application components with their Angular 2 counterparts. The application is still bootstrapped as a hybrid, but there isn't really any need for that anymore, and we can begin to pull out the last remnants of Angular 1.
There are just two more things to do: We need to switch the router to the Angular 2 one, and then bootstrap the app as a pure Angular 2 app.
Let's do the routing part first. Angular 2 comes with a shiny new router,
but it isn't included by default. Just like we did with Http, we need to
include it in index.html before the System.config() script first:
In the main app module we need to import a few things from the router module:
Angular 2 applications all come with a root component, which, among other
things, is where we should plug in the router. We don't yet have such a root
component, because our app is still managed as an Angular 1 app.
Let's change this now and add an AppComponent class, which replaces the
configure function in app.module.ts:
This is a component that plugs in to an <pc-app> element on the page,
and has a simple template that only includes the router outlet component
of the Angular router. This means that the component just renders the contents
of the current route and nothing else. The @RouteConfig decorator defines
the Angular 2 counterparts of our two routes. They refer directly to the
two components.
We should put this <pc-app> element in the HTML so that the root component
has something to attach to. It replaces the old Angular 1 ng-view directive:
In the PhoneDetail component we now need to change how the phone id parameter
is received. There will be no more $routeParams injection available, because
that comes from the Angular 1 router. Instead, what we have is a RouteParams
object provided by the Angular 2 router. We use it to obtain the phoneId from
the params:
We should also make the corresponding change in the unit test. We provide
an instance of the RouteParams class instead of the $routeParams object:
With that, we're ready to switch the bootstrap method of the application from that
of the UpgradeAdapter to the main Angular 2 bootstrap. Let's import it together
with a couple of other things in app.module.ts
We'll now use the regular Angular 2 bootstrap function to bootstrap the app
instead of using UpgradeAdapter. The first argument to bootstrap is the
application's root component AppComponent, and the second
is an array of the Angular 2 providers that we want to make available for
injection. In that array we include all the things we have been registering
with upgradeAdapter.addProvider until now, as well as the providers and
directives of the router:
We are now running a pure Angular 2 application!
But there's actually one more cool thing we can do with the new router.
We no longer have to hardcode the links to phone details from the phone
list, because the Angular 2 router is able to generate them for us with
its routerLink directive. We just need to refer to the route names we
used in the @RouteConfig:
For this to work the directive just needs to be declared in the component:
To bring our Protractor test suite up to speed with the latest changes,
there are a few remaining things we need to do. Firstly, now that we're
no longer running Angular 1 at all, we should let Protractor know it
should not be looking for one but instead find Angular 2 apps from
the page. Add the following configuration option to protractor-conf.js:
Also, there are a couple of Protractor API calls in our test code that
are using the Angular 1 $location service under the hood. As that
service is no longer there, we need to replace those calls with ones
that use WebDriver's generic URL APIs instead. The first of these is
the redirection spec:
And the second is the phone links spec:
Now our E2E test suite is passing too, and we're ready to remove Angular 1 from the project!
Saying Goodbye to Angular 1
It is time to take off the training wheels and let our application begin its new life as a pure, shiny Angular 2 app. The remaining tasks all have to do with removing code - which of course is every programmer's favorite task!
First, rename app.module.ts to app.ts. It will no longer be setting up
an Angular 1 module, so it doesn't really make sense to call it a module.
Then remove all references to the UpgradeAdapter from app.ts. Also remove
the Angular 1 bootstrap code, type definitions, and the imports of the core,
phoneList, and phoneDetail modules. Instead import the PhoneList and PhoneDetail
components directly - they are needed in the route configuration.
When you're done, this is what app.ts should look like:
You may also completely remove the following files. They are Angular 1 module configuration files and type definition files, and not required in Angular 2:
app/js/core/core.module.tsapp/js/core/upgrade_adapter.tsapp/js/phone_detail/phone_detail.module.tsapp/js/phone_list/phone_list.module.tstest/test_helper.ts
Finally, from index.html and karma.conf.js, remove all references to
Angular 1 scripts as well as jQuery. When you're done, this is what index.html
should look like:
And this is what karma.conf.js should look like:
That is the last we'll see of Angular 1! It has served us well but now it's time to say goodbye.